19 December 2011

Soft Raspberry Coconut Ice

I spent the whole of last week making food for our Christmas party which was on Saturday and didn't remember to take photos of the final products at all... one of these was the Soft Raspberry Coconut Ice from Short and Sweet by Dan Lepard. This sounds a bit strange and Joe told me not to make them because they sounded weird. However, I made them anyway and there were none left! They went down incredibly well so I can't recommend them enough. I'm cross I haven't got a finished picture of these in their little silver petit four cases (from Lakeland of course) but I will definitely be making them again so I will add photos then. Just imagine beautiful old fashioned looking cubes with a lovely pink layer on top of a white layer.

Soft Raspberry Coconut Ice
Makes about 65 squares

For the white mixture:
250g icing sugar
100g mascapone
150g desiccated coconut

For the Raspberry mixture:
50g fresh raspberries
50g mascapone
250g icing sugar
200g desiccated coconut

You will need an18cm square tin lined with non-stick baking paper. Make this the day ahead for perfect consistency.

1. Make the white ice first by beating half the sugar with the mascapone until you have a smooth runny paste.

2. Stir in the coconut and remaining sugar, mix well then press into the bottom of the tin. Pack the mixture in well and smooth the top.
The coconut layer in the tin

3. Squish the raspberries with the mascapone and half the sugar until smooth. Then stir in the coconut followed by the remaining sugar.

4. Spread this carefully over the white ice until you have it even then press it down firmly with a spatula and your fingers.

5. Loosely cover the tin, with the top of the ice exposed to the air slightly and leave overnight somewhere cool to firm.

6. The next day, use the baking paper to lift the ice out of the tin and then cut it into pieces.
SHARE:

29 October 2011

Hokey Pokey

Crisis - was off to a friends for supper and had spent such a lovely day having lunch and pedicures with my mum that I'd completely forgotten to get anything to take to them... panic not. While the Mumma was getting ready to go out I made some hokey pokey which is another name for honeycomb and then thank god for my Lakeland obsession because it meant I had a little plastic bag and ribbon to put it in.


Really simple easy recipe and much nicer than shop bough chocolates.

Hokey Pokey

100g caster sugar
4 tbsp golden syrup
1 1/2 tsp bicarbonate of soda

You need a baking tray with some reusable baking paper or greased tin foil on it. This isn't for cooking this is for pouring the hokey pokey onto to set.

1. Put the caster sugar and golden syrup in a saucepan and while it's still off the heat, stir it around to mix it together a bit.

2. Put the pan on a high-ish heat and DO NOT STIR. Just watch it for about 3-5 minutes - it should all melt together and then when all the sugar has gone and it is bubbling and darkish brown (maple syrup colour) remove from the heat and whisk in the bicarbonate of soda. It will all whooosh up but that's what it's supposed to do.

3. Tip this onto the prepared baking tray and leave to set - about 20 minutes. Then break it up by hand, rather than with a rolling pin, and put into it's receptacle.
SHARE:

10 July 2011

Fruit-free Fridge Cake

I'm not much of a cake fan, I don't really have a sweet tooth but I have always found fridge cake pretty irresistible. I have, however, never made it... until now. Lovely friends had brand spanking new baby and I didn't even have time to make my New Baby Brownies but I did want to take something homemade round that would be useful to give to all the visitors you inevitably have when you bring your baby home. This gave me the perfect excuse to make fridge cake and although I took a big box round to them I did keep 8 or so little slices for us as a treat. This is incredibly easy and versatile - you can use whatever you have in the cupboard and of course you can use fruit and nuts if you like but I think it's so incredibly decadent you should just go for it on the naughty front and keep the fruit for another time.


FRUIT-FREE FRIDGE CAKE
Makes 12 - 16 squares - depending on how you cut them

150g dark chocolate
150g milk chocolate
100g butter
150g golden syrup
250g digestive biscuits, crushed
2 Mars bars, chopped into cubes
2 regular sized bags Malteasers
A handful of mini marshmallows

You need a small-ish baking tin - I used my 8 x 8 inch one that I use for Turkish Delight - line it with clingfilm so that you have lots of overhang on each side.

1. Melt the chocolate, butter and golden syrup in a heatproof bowl over a pan of boiling water stirring occasionally.

2. When it has all melted together remove from the heat and stir in the biscuits, Mars bar, Malteasters and marshmallows.

3. Tip the whole lot into your cake tin and make sure it's in every corner and relatively smooth on top - a potato masher is good for this.

4. Cover the top with the overhanging clingfilm and put in the fridge until you need it or for at least 2 hours.

5. When you are ready to chop it up then you can use the clingfilm to maneuver it out of the tin. Then cut up with a sharp knife into the size squares you like. This is best kept in the fridge when you are not wanting it and lasts for ages.
Chopping up the fridge cake!
SHARE:

22 December 2010

Chocolate Peanut Butter Cups

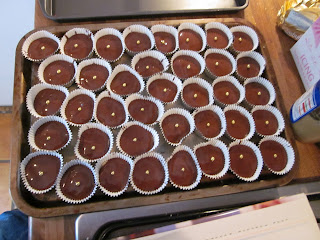
I love making canapes for parties. I often love it more than the party itself but, not having a sweet tooth, I sometimes feel like I let the side down rather when it comes to the non-savoury goodies. In fact, I never have any. This year whilst making mince pies I decided to push the boat out and attempt a festive sweet treat. I flicked through Nigella's Christmas - which I had been quite dismissive of until recently - and decided on trying out her Chocolate Peanut Butter Cups, mostly because Joe was practically licking the picture which is usually a good sign.

They were really easy to make, looked lovely and festive and went down a storm so here it is

NIGELLA LAWSON'S CHOCOLATE PEANUT-BUTTER CUPS
Makes approx 45

For the Base:
50g soft dark brown sugar
200g icing sugar
50g soft butter
200g smooth peanut butter

For the Topping:
200g milk chocolate, chopped
100g dark chocolate, chopped
edible gold buttons or stars (I used little balls that I found in the cook shop in Chiswick)

45-50 petit-four paper cases (I used silver ones, Nigella prefers gold)

1. Mix together the brown sugar, icing sugar, butter and peanut butter - you can either do this by hand, in a freestanding mixer or, like me, in the trusty magimix - until you've got a sandy paste.
The sandy peanut-butter mix

2. Using your hands form small 1 tsp discs to go in the bottom of the petit-four cases. Press the sandy mixture as best you can to form a layer at the bottom of each case. I started off a bit nervously with this and found that I had to go back and re-do some as I was being a bit mean!

3. Melt the chocolates gently in a glass bowl over a pan of simmering water (make sure the bottom of the bowl is not touching the water). You can do this in a microwave if you are brave but I always burn the chocolate.

4. Stir the melted chocolates together and allow to cool a little and then spoon 1 tsp into each of the petit-four case covering the peanut-butter base. I found that I only just had enough to go round so I made 45 instead of Nigella's 48-50 but you can always whizz up some more chocolate so it's not a disaster if you do runout.

5. Decorate with your edible gold button or star or whatever of choice. Put in the fridge to set for 30 minutes or so before serving.

chocolate peanut butter cups
You can make these two days ahead and keep, loosely covered in a cool place. I made them on the day and although they were still yummy a couple of days after the chocolate was quite hard from being in the fridge. I was surprised at how easy and satisfying these were to make - minimum fuss, maximum result. Highly recommended.
SHARE:
© Blue Sky and Bunting. All rights reserved.
Blogger Templates by pipdig