I'm leaving my job. Although it's a very nice job, and very convenient, I have been here for six years and complain constantly about not doing what I really want to be doing. The thing is that I've never really known what I want to do and then realised that just because I love make-up (doing it, writing about it, reading about it, watching it) doesn't mean it can't be a job so I'm jumping in feet first and may or may not sink but I've got to do it... haven't I?
However, what this does mean is that I daydream about doing make-up and being a super nest-making, recipe testing, housewife extraordinaire and actually woke up this morning and made a list about which rooms I'm going to spring clean first (even though it will be October). I'm not sure whether this will actually turn into - I tidy the utility room, walk the dog and then sit down and weep about my work friends and my loss of independence but lets hope not. Joe has been incredibly supportive and has pointed out that I work my little, stubby fingers to the bone most of the time so no doubt I'll do it now and when my mum gave me Cabbages and Roses Guide to Natural Housekeeping (Cabbages & Roses Guide)for my birthday I was so inspired by it that it made me think that yes - even if at first work is a bit slow I will at least be filling my hours and trying to make the most of my new life.
This guide is the perfect present for the nester you know or anyone who is constantly threatening to do wonderful things in their home and yet never quite gets round to it. It lists all the incredibly household uses for vinegar, bicarbonate of soda and beeswax, exactly what to do to make your airing cupboard bearable and what is best to grow if you have a small window box or an allotment. Not only is it full of great advice it is all good for the environment and therefore pretty good for your pocket too which is much needed. This is what has inspired me to start my autumn clean with the airing cupboard - I must have one like one in the book or I will explode. In fact it's so inspiring I've already made a start and got Joe to clean the fridge out with a vinegar/water solution that has worked wonders. A perfect present and a fantastic, inspirational read.
31 August 2011
18 August 2011
Quails Egg Pasta
OK so I wasn't going to write this up as there are no photos or measurements and it all seems a bit obvious BUT it was incredibly yummy and as weird as it sounds sometimes, just sometimes, you may have a few left over quails eggs and it's a bit hard to know what to do with them (apart from boil them and eat them with celery salt which is of course always perfect). This was incredibly soothing and delicious but you don't actually need too many quails eggs because it will become a bit 'quiet making' as it's called in my family.
Now I know there are ways you can make this more exciting, you can use roast garlic (wrap the garlic in foil, roast in 180C oven for half an hour, cool, squeeze out of skin, mash with fork)but that is fiddly and the point of this recipe is that it's supposed to be quick and soothing. For this I even couldn't be bothered to go out and get herbs to add in. All of this you can and I won't mind... but I wanted instant, yummy and no more quails eggs left hanging around in my fridge.
Quails Egg Pasta
Serves 2
Quails eggs, however many you want. I think 2-3 per person is good
200g spaghetti (or whatever pasta you have kicking around)
Parmesan, a good lot I'd say about 40g
Double cream, about 150ml
Garlic salt, good pinch
Pepper
1. Put the pasta on to boil.
2. Pour the cream, Parmesan, garlic salt and pepper int a bowl and whisk together. Taste it for seasoning. If you want more garlic but less salt then use garlic granules.
3. Cook the quails eggs - I think a minute and a half is good as they should then be still slightly soft boiled but peelable. It takes a while to peel these so don't leave to the last minute as it will just make you cross.
4. Drain the pasta, stir in the cream mixture and put into bowls. Grate a little extra Parmesan onto the pasta and gently stir through. Cut the eggs in half and put them on top of the pasta. YUM
Computer Problems
My laptop hates me and has decided to let it's battery die which not only means I can't really blog properly but I also can't download and then upload my photos... I have another battery on the way (fingers crossed it is the battery that's the problem) so will be up and running again before long! Hopefully...
16 August 2011
Salmon Marinade
I know this seems silly but I've been surprised by how many people ask me for this so I thought I'd do the one I did last night for our stir-fry. When we're trying to lose a bit of weight Joe and I eat a lot of stir-frys as a sort of vegetable vehicle for meat and fish. It's quick and easy and can be a really taste, healthy alternative if you are bored of the usual diet foods. This marinade would obviously work for other ways of cooking salmon - with pak choi and jasmine rice for instance - but this is great because you can add a bit of it to the vegetables while you are cooking the salmon to add a bit of flavour.
Salmon Marinade
Will cover 2-3 salmon fillets
3 tbsp soy sauce
3 tbsp teryaki
1/2 tbsp runny honey
1/4 tsp wasabi paste
Obviously you can use as much or as little wasabi as you like. This is quite strong but you are not actually rubbing it into the fish so it won't be as strong when it's finished.
1. Whisk all the ingredients together, pour onto the same fillets in a ziplock bag or tuppaware.
2. Put in the fridge for an hour or so. I then grill the salmon for 3 minutes on one side and 1 minute on the other so it's still really rare in the middle. Also smells a little less than frying!
12 August 2011
Coq au Riesling
The thing about occasionally feeling miserable is it's hard to motivate yourself to plan what to cook for a dinner party. I was so bad on Sunday night that Joe resorted to scouring through our cookery books to see if anything was easy and appealing and came across this fantastic recipe in Nigella Express. The most strenuous part of this recipe is the chopping of the chicken and it's incredibly tasty and really soothing actually which is just what I needed. I served it with garlicky, buttered tagliatelle.
Nigella suggests that this would be at it's best if you let this get cold and then reheat it the next day which is what I would have done if I was more organised and hadn't spent my time lying around on the sofa being morbid.
Coq au Riesling
Serves 6
2 tbsp garlic oil
150g pancetta
1 leek, finely sliced
12 boneless, skinless chicken thighs
3 bay leaves
300g oyster mushrooms, torn into strips
1 x 75cl bottle Riesling
double cream
salt and pepper
1-2 tbsp chopped fresh dill
I made this is a large oval le creuset casserole which was great as it could go straight on the table when it was ready - but you basically just need a big pot with a lid. As I wanted to do minimal shopping I used what chicken I had in the freezer which was 8 boneless chicken thighs and 4 chicken breasts and it was fine. We also couldn't find oyster mushrooms so we just used normal ones quite thinly sliced. This is great for a dinner party because once it's cooked you can either keep it on a really low heat keeping warm.
1. Heat the oil in your pot and fry the pancetta until crisp.
2. Add the sliced leek and soften it with the pancetta for a minute or so.
3. Cut the chicken into pieces (2 or 3 for the thighs, a few more for breasts), tip into the pan, add the bay leaves, mushrooms and wine.
4. Season with salt and pepper to taste and bring to the boil. Cover the pan and simmer gently for 30-40 minutes, stirring in the double cream for the last couple of minutes.
5. Sprinkle with dill and serve.
Nigella suggests that this would be at it's best if you let this get cold and then reheat it the next day which is what I would have done if I was more organised and hadn't spent my time lying around on the sofa being morbid.
Coq au Riesling
Serves 6
2 tbsp garlic oil
150g pancetta
1 leek, finely sliced
12 boneless, skinless chicken thighs
3 bay leaves
300g oyster mushrooms, torn into strips
1 x 75cl bottle Riesling
double cream
salt and pepper
1-2 tbsp chopped fresh dill
Loads of chicken - chopped by Joe |
I made this is a large oval le creuset casserole which was great as it could go straight on the table when it was ready - but you basically just need a big pot with a lid. As I wanted to do minimal shopping I used what chicken I had in the freezer which was 8 boneless chicken thighs and 4 chicken breasts and it was fine. We also couldn't find oyster mushrooms so we just used normal ones quite thinly sliced. This is great for a dinner party because once it's cooked you can either keep it on a really low heat keeping warm.
1. Heat the oil in your pot and fry the pancetta until crisp.
2. Add the sliced leek and soften it with the pancetta for a minute or so.
3. Cut the chicken into pieces (2 or 3 for the thighs, a few more for breasts), tip into the pan, add the bay leaves, mushrooms and wine.
Pre-Simmering |
Post-Simmering |
Nearly ate it all before I remembered to take a photo |
Labels:
chicken,
Main Course,
Nigella Express,
Nigella Lawson,
recipe test
11 August 2011
Easy Smoked Trout Pate
I sometimes find that I have left over cream cheese hanging about the fridge from another recipe and as I try to always have smoked trout or salmon in the freezer a really yummy way to use the cream cheese (that does not involve bread and marmite) is to make pate. There are more exciting recipes which I will put up here eventually but this is great a great quick starter or lovely to have with hot toast and butter on a Sunday night. It's simple, easy, quick and delicious.
Easy Smoked Trout Pate
Serves 4 (as a starter)
2 smoked trout fillets (about 125g)
50-75g cream cheese
2 tbsp lemon juice
cayenne pepper
1 tbsp horseradish
Dill
I put this in little terracotta ramekins with a sprig of dill on top if I am making for a starter and serve with home made melba toasts. If it's just for us then in a small bowl for us to share is fine. You can add as much or as little cream cheese as you like - I often add 50g and then taste and add more if I feel like it at the time. I use a pinch of cayenne pepper but I know a lot of people who would like to add more so you can do that according to your taste. You can always sprinkle a tiny bit on the top if you have some who like it hotter than others.
1. Put all the ingredients in a blender, blend until the consistency you like.
2. Very important. Taste it - add more of whatever you like.
3. Decant into ramekins or bowl, cover and put in the fridge until you need it.
10 August 2011
Watercress Soup
I'm not very good with numbers, although I have known this for years and have whole heatedly given myself over to my numerical incompetence every now and again it rears it's ugly head in the kitchen. When ordering the ingredients for the Salmon and Watercress salad last week I ordered 200g of Watercress rather than the necessary 100g which is why on the hottest day of the year so far I was to be found making Watercress soup. It was actually really tasty and because I put in the fridge after I made it, it meant that the next night I could just heat it up which was actually much nicer than slaving in the kitchen in the sweltering heat. This is incredibly easy...
Watercress Soup
Serves 2 or 4 as a little starter
4 new potatoes, peeled and quartered
1 yellow onion, roughly chopped
1/2 pint stock, can be chicken or vegetable, I used Hugh F-W's souper mix which I had in the fridge
75g watercress
Milk
double cream if you have it
Butter
Olive Oil
salt and pepper
You just need a big pan for this and a blender.
1. Heat the oil and butter in the pan and sweat the onion until translucent - 5 or so minutes.
2. Add the potatoes and cook for a further 5 minutes without letting them get brown.
3. Add the watercress to the pan with the stock, season and then cover the pan and simmer it gently until the potatoes are tender. About 10 minutes.
4. Switch off the heat and allow the soup to cool a little before pouring it into the blender and whizzing it.
5. Clean the pan and return the blended soup to the heat and add enough milk to give it a nice consistency.
6. Bring to simmering point and then remove the pan from the heat, test the seasoning and serve in soup bowls with a swirl of the double cream and a few bits of chopped watercress if you've got any leftover.
Labels:
leftovers,
lunch,
Main Course,
original recipe,
soup,
Starters,
vegetarian
5 August 2011
Chocolate Butter Icing
This is an easy recipe but I thought it would be useful to have it separately. This makes enough icing to do the middle and top of a cake as long as you don't overdo either! This is really useful as you probably have everything you need in your cupboards and fridge.
CHOCOLATE BUTTER ICING
125g salted butter at room temperature
250g icing sugar
1 tbsp cocoa powder dissolved in 1 tbsp boiling water
It is really important that the butter is at room temperature or your arm is going to hurt and it's not going to blend together smoothly. You can use a mixer for this but frankly it'll take you longer to set it up and then wash it all than it will to make this by hand.
1. Beat together the butter, sugar and cocoa mix in a bowl with 1 tbsp boiling water.
2. When it's smooth, check the taste and then cover with clingfilm and chill until you want to use it.
Cockeyed Cake
This is an incredibly old recipe but it is by far and away the easiest chocolate cake to make. It takes 10 mins max to make and 30 mins or less in the oven. This is a particular favourite of mine for any last minute cake necessities and things that require all attendees to bring something along (I hate that normally...). The recipe I use is based on Peg Bracken's from The I Hate to Cook Book and is all measured in cups. I have done the conversion but left the cups in as that's what I use for this and it just adds to the ease.
The reason I'm making this cake tonight is that today is Mouse's (the dog's) birthday so tomorrow as some light relief in the office we are having traditional office tea and cake. I am making Mouse a peanut butter and carrot cake which is dog friendly but thought I can't really not make one for the human attendees and this is the obvious one to choose. This cake can be iced or not - this time I made butter icing because I didn't have enough plain chocolate and cream for ganache which is what I usually do. The one thing is to not ice this too early. The icing will slide off and you will be sad.
No don't freak out when you see the ingredients, it's unconventional but it works and it makes the best tasting batter ever.
COCKEYD CAKE
1 1/2 cups (340g/12 oz) plain flour
3 tbsp cocoa
1 tsp bicarbonate of soda
1 cup (226g/8 oz) sugar
1/2 tsp salt
5 tbsp cooking oil (I use sunflower oil)
1 tbsp vinegar
1 tsp vanilla extract
1 cup (240 ml) cold water
Pre-heat the oven to 180C/350F. I make this in an 8x4 inch loaf tin.
1. Sift the flour, cocoa, bicarbonate of soda, sugar and salt together into a large mixing bowl.
2. Tip in the cooking oil, vinegar, vanilla and cold water and mix together until it's nearly smooth and all the flour is mixed in. This feels like pretend cooking but it will work.
3. Tip into the greased tin and cook for 30ish minutes. I check mine after 25 but this time took the full 30.
4. Leave to cool in it's tin on a cooling rack for half an hour or so and then turn it out and leave to cool completely. Ice... or not.
1 August 2011
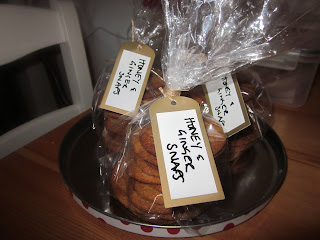
Rachel Allen's Ginger and Honey Snaps
Yet another tasty and easy recipe from Bake although I did make some amendments throughout - as always. When I was off on the sponsored ride I needed to take something to each of the three places I was staying as a thank you present and I thought home made biscuits would be quite nice. I'm a real sucker for ginger biscuits even though on the whole I'm not a huge biscuit fan so I've been desperate for an excuse to make these since I got the book.
I think if you followed the recipe exactly you get sort of cookie size biscuits which was fine but I wanted something a little smaller so rather than the 20 biscuits I got about 40. If you'd rather have smaller biscuits then roll the dough smaller than a walnut - they need to be really small as they grow quite a lot in the oven.
Ginger and Honey Snaps
Makes about 20 cookie size or 40 smaller
225g self-raising flour
2 tsp bicarbonate of soda
a pinch of salt
1 tsp ground ginger
1 tsp mixed spice
1/2 tsp ground cinnamon
100g caster sugar
125g butter, cold and cubed
100g (approx 7 tbsp) runny honey
Pre-heat the oven to 180C/350F/Gas Mark 4. The recipe says 1 large baking sheet but I use two and alternate them. These are quick cooking biscuits so you can be making up a tray while one cooks... and I don't have a large baking sheet anyway (snivel). I use a re-usable baking sheet but you can grease the tins with vegetable oil if you prefer. It's also useful to have a measuring jug with water in it and fork resting in it - you need a damp fork to shape the biscuits and it's good to get this ready before your hands get all doughy.
1. Sift the flour, bicarbonate of soda, salt and spices into a large mixing bowl - add the sugar and mix well.
2. Rub the butter into the flour and spices, using your fingers, until the mixture resembles breadcrumbs.
3. Heat the honey gently in a small saucepan, then pour into the flour using a wooden spoon to mix it altogether.
4. Sprinkle 1 tbsp of caster sugar on a side plate and then, using floured hands, roll the dough into small balls, roll in the caster sugar and then place on the prepared baking sheet. They need quite a bit of room on the sheet as they will expand.
5. Using a damp fork flatten the balls to make biscuit shapes and bake in the oven for 7-10 minutes. My oven blows hot so these actually took just under 7 minutes. You really want these to be just golden brown. If they are too dark they will taste bitter.
6. Leave on the baking tray for two minutes before carefully transferring to a wire cooling wrack.
You can make the dough a couple of days ahead, roll into a sausage, cover with cling film and keep in the fridge. When you want to make the cookies chop a slice off the sausage and roll as above.
Labels:
baking,
office treats,
Rachel Allen,
Rachel Allen Bake,
recipe test,
tea time
Subscribe to:
Posts (Atom)
©
Blue Sky and Bunting. All rights reserved.