24 October 2012

Beef, Stout and Anchovy Pie

It's that time of year again - pie night - where I make a pie for my friends Libby and Ian. I'm not even a huge fan of pie but they are fun to make, they take time but are very satisfying when they come out of the oven all golden and lovely. Last years pie was Steak and Stout and this years was a quicker, simpler (pregnancy) version courtesy of Rachel Allen's lovely book Bake. I say simpler, it was still time consuming but you can make it quicker by using puff or flaky pastry from the shop in place of the hot water crust pastry she recommends and I used here. I served this with baked potatoes and peas.

Beef, Stout and Anchovy Pie

Serves 4-6

For the pie: 
4tbsp olive oil
600g stewing beef, trimmed and cut into 2cm chunks
salt and freshly ground black pepper
400g button mushrooms, cut into quarters
2 large onions, peeled and sliced
4 large cloves of garlic peeled and chopped
500ml beef or chicken stock
250ml bottle of stout
1 tbsp chopped tarragon
30g tin anchovies, drained
1 x quantity hot water crust pastry (see below)

For the pastry:
75g butter, cubed,
100ml water
225g plain flour
pinch of salt
1 egg, beaten

You will need 1 medium pie dish or 4-6 individual dishes, a large oven-proof casserole and a big mixing bowl and rolling pin for the pastry. Pre-heat the oven to 150C/300F/Gas Mark 2.

1. Place a large ovenproof casserole over a medium heat. Add 2 tbsps of olive oil and the beef and cook until brown (do this in batches if necessary). Season with salt and pepper, then remove with a slotted spoon and set aside.

2. You may need to tip some excess juices out, then add 1 more tbsp of olive oil and the mushrooms, season and cook until browned. Remove and set aside.

Chopped mushrooms
 3. Pour the last tbsp of olive oil into the casserole and add the onions and garlic. Toss these for 1 minute, then add the beef, mushrooms, stock and stout. Bring to the boil, cover, reduce the heat and simmer gently on the hob or, as I did, into the preheated oven for 1-1½ hours or until the meat is tender. Depending on the meat, it may even take a bit longer.

4. Add the chopped tarragon and season to taste, but go slightly easy on the salt as you'll be adding anchovies later on. Allow to cool, while you make or prepare the pastry. Preheat the oven to 230C/450F/Gas Mark 8.

5. To make the pastry: place the butter and water in a medium-sized saucepan and heat gently, stirring occasionally, until the butter melts, then allow the mixture to come to a rolling boil.

 6. Sift the flour and salt into a large bowl. Make a well in the middle and add the egg and stir it in to the flour slightly.

7. Pour the hot liquid into the flour and stir with a wooden spoon to mix.

8. Spread the mixture out on a large plate with a wooden spoon and allow to cool (about 15 mins), then remove the pastry from the plate (easiest done with a metal spatula) wrap in cling film and place in the fridge for 30 mins until firm.

Pastry cooling on a plate
9.  Place the pie filling in the dish/s. Place 1-2 anchovies in each individual dish or all the anchovies in the large dish spaced apart from each other.

Pie filling in dish


10. Roll the pastry out, cut out rough lengths and stick these to the edge of the pie dish using egg or beaten water. Paste these strips with water or beaten egg and then add your pie top. Crimp the edges with your thumb and index fingers and add decoration of your choice (I use a cow cookie cutter as its a beef pie).

Pie pre-cooking
11. Cook in the oven for 10 mins before reducing the heat to 200C/400F/Gas Mark 6 and cooking for a further 20-30 mins.


SHARE:

14 July 2012

Jam Cookie Sandwiches

When a friend comes for tea I try to bake something new to try although as I'm getting bigger I'm also getting slightly lazier on that front. Which is a little weird as this baby wants me to eat sweet things all the time - which is a little mean of it as I'm now the size of a house. This tea time we're having Rachel Allen's Festive Jam Cookie Sandwiches from Bake and they were actually incredibly easy to make but gave me a new found respect for the incredible neatness of the ones pictured in the book. Mine don't look half so beautiful but they are incredibly yummy and I'm now always pleased to find new ways to eat jam - this is a great one!

She says to do these at Christmas as they look festive but I think they are just fine for any time of year. I left out the lemon zest because I hate lemon... I also halved the recipe because of my fear that I'm going to give myself pregnancy diabetes if I carry on like I am. Halving the recipe made about 10 cookies but I had to use a slightly bigger cutter than she does so I could make the holes... if that makes sense. You'll see what I mean.

Jam Cookie Sandwiches

Makes about 35

425g (15oz) plain flour
75g (3oz) caster sugar
2 tsp vanilla extract
2 tsp finely grated lemon zest (from 1 large lemon)
4 egg yolks
325g (11 ½oz) butter, softened
Raspberry or strawberry jam
Icing sugar for dusting

Pre-heat the oven to 180C/350F/Gas Mark 4. You will need  6cm (2 ½ inch) plain cutter and a 3cm (1 ¼ inch) cutter. I did half with sweet-tip raspberry jam and half with apricot. I used a magimix and it made the whole thing incredibly fast.

1. Sift the flour into a large bowl or electric food mixer and add the sugar, vanilla, lemon zest, egg yolks and butter. Mix until it all comes together in a dough.


2. Remove from the bowl and flatten with your palm or a rolling pin to about 2cm thick and chill in the fridge for at least 30 minutes (longer if possible).


3. Roll the dough out on a lightly floured work surface until it's about 5mm thick, then, using the 6cm plain cutter, cut the dough into discs.

4. Take half the discs and using the smaller 3cm cutter, cut holes out of the centre of each, like little round windows. Bring the discarded scraps together and make more discs and tops - you want to end up with an equal amount.

5. Place the discs on several prepared baking trays and bake in the oven for 8-10 minutes until pale golden and ever so slightly firm.


6. Allow to stand for a couple of minutes, then remove to a cooling rack.

7. When the discs are cool spread the whole discs with jam and top with a disc with a hole in it. Dust with icing sugar and serve.


SHARE:

21 September 2011

Rachel Allen's Sticky Toffee Pudding

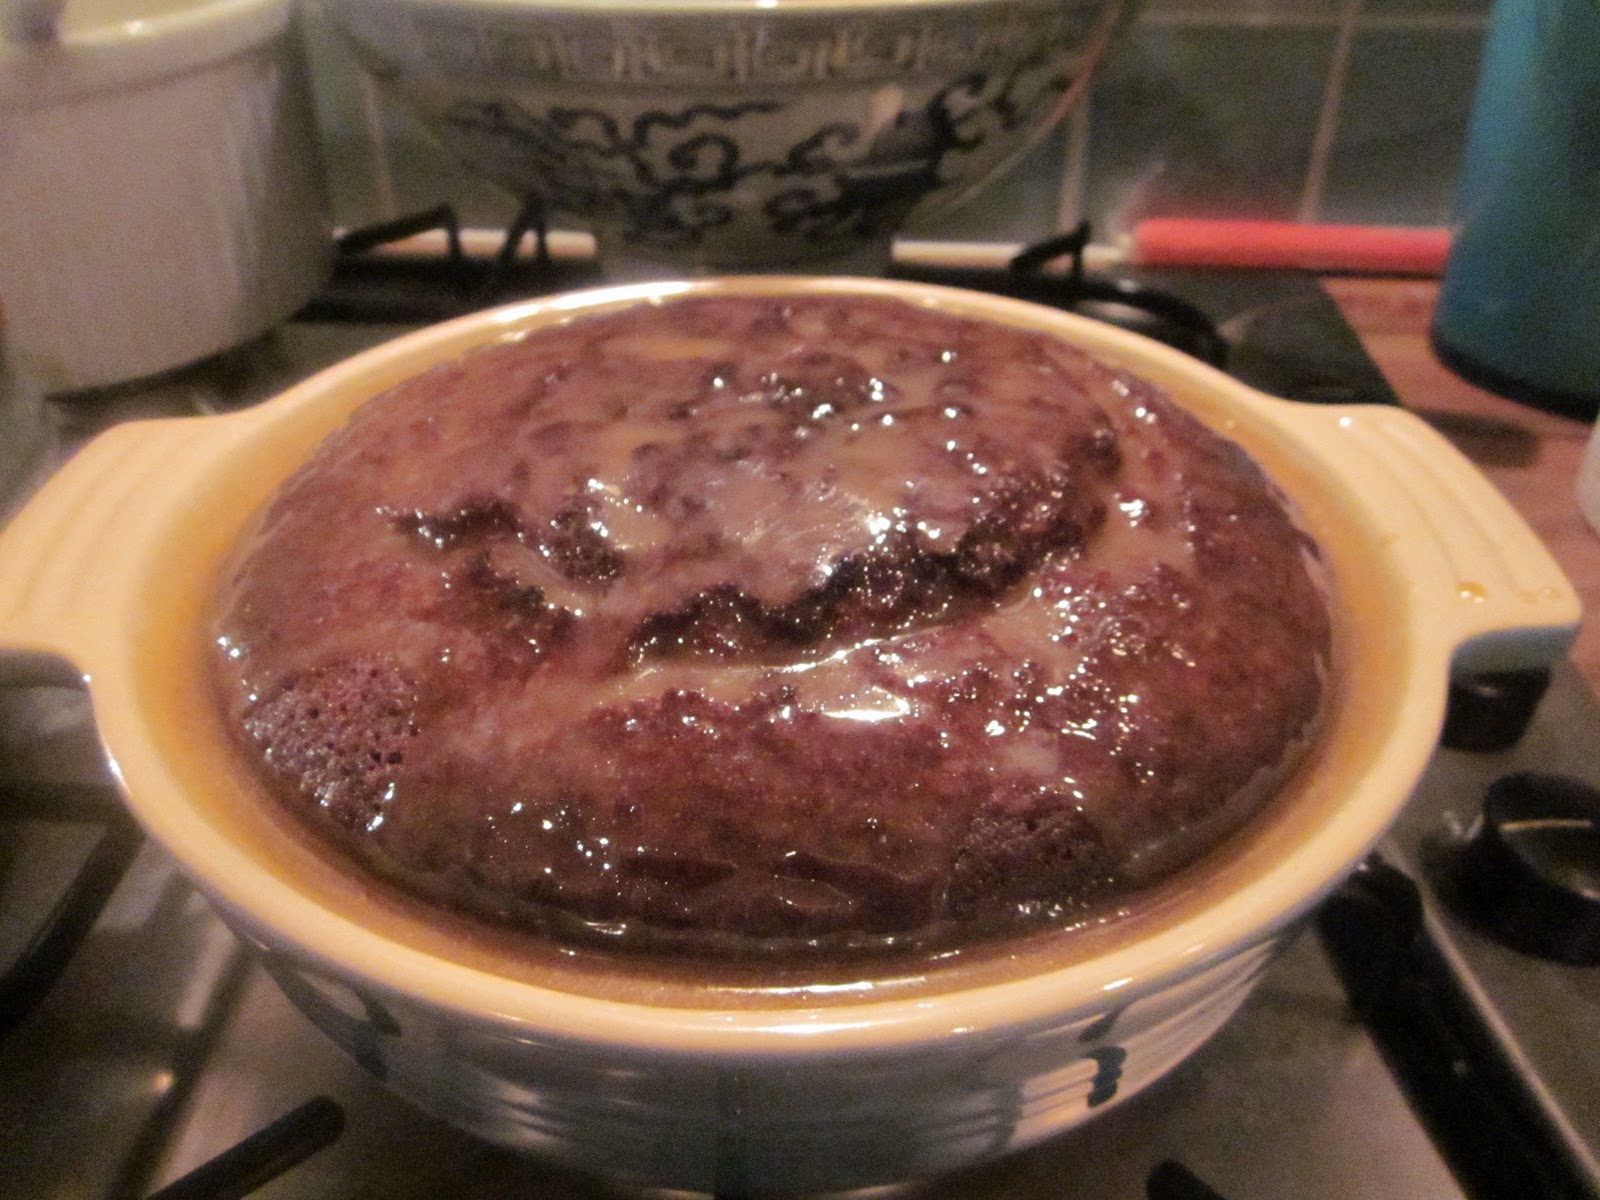
I'm not a pudding eater as you know but another request from my cousin was the Sticky Toffee Pudding she saw in Bakeand I'd never made it again so I thought it was worth a try. It was incredibly popular and I think may well become a regular for quick, easy make ahead puds that are really impressive. My father-in-law even liked it and he usually is not at all enthused by my cooking. I will definitely try and be more organised and cook this ahead, and maybe even freeze it, when I know I have a dinner party coming up.

Sticky toffee pudding


Serves 6

225g dates (stoned weight), chopped
250ml black tea, not too strong
100g butter, softened
175g golden caster sugar
3 eggs
1 tsp mixed spice
1 tsp vanilla extract
225g self-raising flour
3/4 tsp bicarbonate of soda
Whipped cream to serve

Toffee sauce:
110g butter
250g soft light brown sugar
275g golden syrup
225ml double cream
1/2 tsp vanilla extract

Pre-heat the oven to 180C/350F/Gas Mark 4. I made this in a cake tin and then decanted into a round le cruset dish I have so could pour some of the sauce over it. Butter and flour the sides of the tin and line the base with greaseproof paper. You can coo in advance and keep for five or six days in an airtight container in the fridge or three months in the freezer. Just cover with tin foil and warm up in a low oven (defrosting first if frozen).

1. Place the chopped dates and tea in a saucepan and bring to the boil. Cook for a few minutes until the dates are softened and then remove from the heat and put to one side.

2. Beat the butter in a large bowl or in a mixer until soft. Add the sugar and beat until pale and fluffy. Beat in the eggs one at a time and then add the vanilla extract and spices.

3. Fold in the date mixture (including the tea). If you are using a mixer it may be easier to now transfer it all to a big mixing bowl and then sift in the flour and bicarbonate of soda and fold gently until mixed.

Pre-cooking... not very appetising
4. Pour the mixture into the prepared tin and bake for about 45 minutes until the top is just firm to the touch and a skewer comes out clean when inserted into the middle.

5. Allow to stand in the tin for about 5 minutes before removing and transferring to a serving plate or dish. While the cake is cooking make the toffee sauce as shown below.

6. I poured some of the sauce over the pudding and then put the rest into a jug so it could be poured over the slices as they were cut. Serve with whipped cream or ice cream.

For the toffee sauce:

1. Put all the ingredients in a saucepan and cook over a high heat for about 5 minutes, stirring regularly, until it has thickened. Serve warm.
Sticky Toffee Pudding
SHARE:

1 August 2011

Rachel Allen's Ginger and Honey Snaps

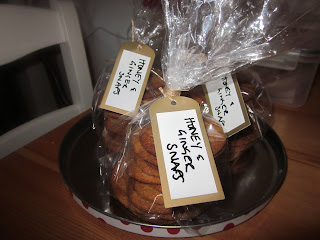
Yet another tasty and easy recipe from Bake although I did make some amendments throughout - as always. When I was off on the sponsored ride I needed to take something to each of the three places I was staying as a thank you present and I thought home made biscuits would be quite nice. I'm a real sucker for ginger biscuits even though on the whole I'm not a huge biscuit fan so I've been desperate for an excuse to make these since I got the book.

I think if you followed the recipe exactly you get sort of cookie size biscuits which was fine but I wanted something a little smaller so rather than the 20 biscuits I got about 40. If you'd rather have smaller biscuits then roll the dough smaller than a walnut - they need to be really small as they grow quite a lot in the oven.

Ginger and Honey Snaps

Makes about 20 cookie size or 40 smaller

225g self-raising flour
2 tsp bicarbonate of soda
a pinch of salt
1 tsp ground ginger
1 tsp mixed spice
1/2 tsp ground cinnamon
100g caster sugar
125g butter, cold and cubed
100g (approx 7 tbsp) runny honey

Pre-heat the oven to 180C/350F/Gas Mark 4. The recipe says 1 large baking sheet but I use two and alternate them. These are quick cooking biscuits so you can be making up a tray while one cooks... and I don't have a large baking sheet anyway (snivel). I use a re-usable baking sheet but you can grease the tins with vegetable oil if you prefer. It's also useful to have a measuring jug with water in it and fork resting in it - you need a damp fork to shape the biscuits and it's good to get this ready before your hands get all doughy.

1. Sift the flour, bicarbonate of soda, salt and spices into a large mixing bowl - add the sugar and mix well.

2. Rub the butter into the flour and spices, using your fingers, until the mixture resembles breadcrumbs.

3. Heat the honey gently in a small saucepan, then pour into the flour using a wooden spoon to mix it altogether.


4. Sprinkle 1 tbsp of caster sugar on a side plate and then, using floured hands, roll the dough into small balls, roll in the caster sugar and then place on the prepared baking sheet. They need quite a bit of room on the sheet as they will expand.


5. Using a damp fork flatten the balls to make biscuit shapes and bake in the oven for 7-10 minutes. My oven blows hot so these actually took just under 7 minutes. You really want these to be just golden brown. If they are too dark they will taste bitter.

6. Leave on the baking tray for two minutes before carefully transferring to a wire cooling wrack.

Rachel Allen's Honey and Ginger Snaps


You can make the dough a couple of days ahead, roll into a sausage, cover with cling film and keep in the fridge. When you want to make the cookies chop a slice off the sausage and roll as above.
SHARE:

10 April 2011

Rachel Allen's Peanut Butter and White Chocolate Blondies

For mothers day my sister and I hosted a lunch for my parents at my flat - we ordered in sushi (from Feng Sushi) and went for a walk in Ravenscourt Park. It was actually pretty nice weather and having assumed it would not be I had persuaded my mother to bring wellies so we strode about the park in the sun feeling like we had got lost on a countryside ramble. We had also decided to do cream tea for when we returned and my penchant for over feeding reared it's ugly head and so I made Rachel Allen's Peanut Butter and White Chocolate Blondies. Now I don't like white chocolate so I didn't try one but I think these went even quicker than brownies... a few were eaten at tea and then Joe took them to work the next day. I don't think they made it to lunch time - always a good sign I think. Highly recommended if you want too cook something easy, yummy and not brownies! This recipe is taken from Bake - a book I'm more and more in love with every time I use it.

Rachel Allen's Peanut Butter and White Chocolate Blondies

Makes 12 squares

125g plain flour
1 tsp baking powder
100g butter, softened
150g crunchy peanut butter
175g soft light brown sugar
1 egg, beaten
1 tsp vanilla extract
75g white chocolate, chopped

Pre-heat the oven to 170C/325F/Gas Mark 3 and line and grease a 20x20cm square cake tin. I softened my butter for 10 seconds in the microwave but if you're clever you can just take it out of the fridge a bit before you want to cook. I used a milky bar for the white chocolate - it was impossible to find an alternative within a 1 mile radius of my flat!

1. Sift the flour and baking powder into a small bowl and set aside.

2. In a large bowl, cream the butter and peanut butter together until very soft. Add the sugar, egg and vanilla extract and beat until combined. Add the flour, baking powder and the chopped chocolate and mix to form a dough.

3. Place the dough in the prepared tin and bake in the oven for 25-30 mins or until golden brown and almost firm in the centre.
Blondie dough

4. Allow to cool in the tin, before removing and cutting into squares*.

*As with brownies I actually find it easier and less messy to cut these in the tin and then using a small spatula to ease them out.
Blondies
Finished Blondies in their tin
SHARE:

17 February 2011

Baked Mediterranean Pasta

I don't know why but I was inclined not to like Rachel Allen but I LOVE her book Bake. I didn't realise how rare it was to find a book where you want to cook absolutely everything in it but I honestly dribble when reading these recipes. Anyway, I'd wanted to cook the Mediterranean pasta for ages and finally we cooked it at my mother's house last weekend and it was just as yummy as it sounded and made me realise what a versatile dish this is to have in your arsenal as you can basically use whatever you want within reason.

The only thing with this recipe is cut everything up before hand. I got everything in front of me and then got so excited about the outcome I had to do frantic chopping as things came up which wasn't ideal. It didn't seem to affect it... it was still yummy. The recipe is below - with a few tiny amendments in brackets.

BAKED MEDITERRANEAN PASTA
Serves 6

100g chorizo, finely sliced or cubed
1-2tbsp olive oil
500g penne pasta
2 x 400g tinned tomatoes, chopped
175ml boiling water (we added an extra cup)
175ml double cream (we added an extra 15ml)
50g chopped spring onion
2tbsp chopped basil
50g capers
100g olives, pitted and chopped
6 cloves of garlic, peeled and chopped
Salt and freshly ground black pepper
1tsp caster sugar
75g soft goats cheese, crumbled
150g Gruyere cheese, grated
75g Cheddar cheese, grated

Pre-heat the oven to 200C/400F/Gas Mark 6. The recipe says you need a 30 x 23 cm ovenproof dish but I don't know how big any of my dishes are so I'd say use a big lasagna dish. And I know I said it before but I'll say it again chop everything before you start! Just do it... or don't and wish you had.

Too busy taking photos to actually chop anything
 1. In a frying pan over a high heat cook the chorizo with the olive oil for 2 minutes and drain on some kitchen paper.

Chorizo in a frying pan
2. In a large bowl mix together the dried pasta with the tomatoes, the boiling water and cream. Add the chorizo, spring onion, basil, capers, olives and garlic.
Taste now!!!

4. Season with salt, pepper and sugar. Taste it. I know it sounds weird but taste it as now is the time to check the seasoning.


5. Place all the mixture in the ovenproof dish and scatter the cheeses on the top making sure the pasta is completely covered. Bake in the oven for 40-50 minutes or until the pasta is cooked and the sauce golden and bubbling.
Cheese is my favourite bit

6. Cover with foil after 30 mins if this begins to dry out. Serve with salad.

I'm pretty sure this would be AMAZING cold the day after... like mac and cheese. But there wasn't any left.
SHARE:
© Blue Sky and Bunting. All rights reserved.
Blogger Templates by pipdig