Oh my god. I hate to start a 'review' like that but they are the first three words that spring to mind when I think about the supper we had last night. Now, due to various job incidents and my inability to not spend all my money immediately I can't really remember the last time I went to a really swanky restaurant so when my father requested Les Deux Salons as his birthday treat I was pretty over excited. I'd read good reviews and been on a diet for weeks so I was more than ready - and I wasn't disappointed.
Les Deux Salons is the real deal - distressed mirrors, tiled flooring and dark furniture it is like being thrown into a Paris restaurant. The staff were delightful if a little frantic - incredibly solicitous and friendly, bringing my father out a delicious ice cream pud with a candle in. The selection of food was varied and interesting - I sat opposite my brother-in-law which is always exciting as he's definitely in the running for the world most adventurous eater award. If I worry that I choose old favourites he's guaranteed to go for the slightly odder things on the menu and last night was no exception - he went for Herefordshire Snail and Bacon Pie followed by the special of the day which was Ox cheeks with spring greens and marrow (both of which he said were really good).
I had Bayonne Ham to start which was delicious and perfectly sliced, served with poached pears. I was worried about my choice of main course, Scottish Beef cheeseburger with fries, was a bit ordinary but it was actually anything but. It was without a doubt the best burger I have ever had the fries were delicious and definitely in my top five fries (no 1 being the Riverside Studios shoestring fries which are AMAZING) but the burger was cooked to perfection and so tasty. I think I may never be able to eat a burger again for fear of sullying it's memory. Other main courses around the table were slow roast pork belly (notably without any crackling) and duck confit. The puddings were iced peanut butter parfait with roast banana and wild strawberries with thick cream - proper wild strawberries which were delicious.
To conclude the service was on occasion slow (in fact we cancelled our side order of puree potato because there was still no sign of it by the time we'd nearly finished our main courses) but incredibly charming and in fact the slowness sort of added to the frenchness of it all. The wine was delicious, the atmosphere was lovely. I highly recommend it.
31 March 2011
28 March 2011
Cheese Cows
Now I am in no way an animal fascist. You can make these in any animal shape you want or indeed any shape you like. This is not really a 'traditional' cheese straw recipe - which I do in either straw or star shape. For this recipe I like animals though - I have pig, cow and elephant... I want more. I want a whole zoo. Anyway, that's not the point. This is a really easy recipe that's yummy and rather addictively tasty.
UPDATE 2017: these are my most requested treat. For every kids party, christmas party, in face any event I get asked to make these.
CHEESE COWS
Makes approx 25 cows
Pre-heat the oven to 180C/355F/Gas Mark 4.
170g (60z) mature cheddar, coarsely grated
60g butter
95g plain flour
1/8 tsp onion powder
1/8 tsp table salt
Pre-heat the oven to 170C/350F/Gas Mark 4. You'll need a food processor (unless you want sore arms), a large baking sheet (or a couple of small ones if you are like me and can never find a suitable big one), and a cooling rack. I only mention it because I only remember I need one when I'm holding the hot baking tray in my hands. You can add more or less of the onion powder as you wish but increase/decrease the salt accordingly as the onion powder is salty itself.
1. Put all the ingredients together in the mixer and blend until it forms a dough. About two minutes.
2. Wrap the dough ball in cling film and refrigerate for half an hour. This makes it much more manageable when you are rolling it and cutting out your shapes later.
3. Lightly flour a surface or board and your rolling pin and roll the dough out until it's reasonably thin (about 3mm). Cut your shapes out with the cutter of choice. It's easiest if you flour the cutter in-between using a small plate of flour but I am usually too lazy to do this.
4. Put the shapes onto a lined baking tray. These go up rather than out so they can be quite close together. I got a bit carried away and used a skewer to make eyes but you really don't have to do that.
5. Bake in the oven for 12-15 mins. Check after 10 though - my oven is quite hot. They need to be browned at the edges although of course it is up to you how cooked they are.
6. Put on a rack to cool. And then into a tin to keep them fresh.
7.Try not to eat them all yourself. Although obviously you can if you want.
UPDATE 2017: these are my most requested treat. For every kids party, christmas party, in face any event I get asked to make these.
CHEESE COWS
Makes approx 25 cows
Pre-heat the oven to 180C/355F/Gas Mark 4.
170g (60z) mature cheddar, coarsely grated
60g butter
95g plain flour
1/8 tsp onion powder
Pre-heat the oven to 170C/350F/Gas Mark 4. You'll need a food processor (unless you want sore arms), a large baking sheet (or a couple of small ones if you are like me and can never find a suitable big one), and a cooling rack. I only mention it because I only remember I need one when I'm holding the hot baking tray in my hands. You can add more or less of the onion powder as you wish but increase/decrease the salt accordingly as the onion powder is salty itself.
1. Put all the ingredients together in the mixer and blend until it forms a dough. About two minutes.
2. Wrap the dough ball in cling film and refrigerate for half an hour. This makes it much more manageable when you are rolling it and cutting out your shapes later.
Dough ready to be rolled |
3. Lightly flour a surface or board and your rolling pin and roll the dough out until it's reasonably thin (about 3mm). Cut your shapes out with the cutter of choice. It's easiest if you flour the cutter in-between using a small plate of flour but I am usually too lazy to do this.
4. Put the shapes onto a lined baking tray. These go up rather than out so they can be quite close together. I got a bit carried away and used a skewer to make eyes but you really don't have to do that.
Cows ready for the oven |
Cooling Cows |
6. Put on a rack to cool. And then into a tin to keep them fresh.
7.Try not to eat them all yourself. Although obviously you can if you want.
Labels:
baking,
cheese,
office treats,
original recipe,
tea time
24 March 2011
Nigella's Apple and Mustard Sauce
I don't eat this and in fact I know a lot of people like their pork plain but for those who don't this is a very good apple sauce and it's really easy to make. You can make this up to two days before and store in the fridge in a non metallic bowl or you can freeze it for up to three months ahead.
NIGELLA LAWSON'S APPLE AND MUSTARD SAUCE
3 large Granny Smith apples, approx 500g
4 tsps, English mustard powder
4 x 15ml tbsp maple syrup
1/2 tsp sea salt flakes
juice 1/2 a lemon
1 spring onion, trimmed and left whole
1. Peel and core the apples, roughly chop them into pieces.
2. Put the apples into a saucepan with the mustard, maple syrup, salt, lemon juice and spring onion (left whole just to give flavour).
3. Put the lid on the pan and bring to a bubbling boil, then turn the heat down to a simmer and cook for 10-15 minutes until the apples are soft, stirring once or twice.
4. Remove the onion and discard, then mash the sauce a little with the back of a spoon if necessary.
5. Taste the sauce and then add more mustard powder if you want although you may want to leave this until the sauce is cold.
6. Sever cold but not straight from the fridge.
NIGELLA LAWSON'S APPLE AND MUSTARD SAUCE
3 large Granny Smith apples, approx 500g
4 tsps, English mustard powder
4 x 15ml tbsp maple syrup
1/2 tsp sea salt flakes
juice 1/2 a lemon
1 spring onion, trimmed and left whole
1. Peel and core the apples, roughly chop them into pieces.
2. Put the apples into a saucepan with the mustard, maple syrup, salt, lemon juice and spring onion (left whole just to give flavour).
Is it me or does the mustard look a bit rude? |
3. Put the lid on the pan and bring to a bubbling boil, then turn the heat down to a simmer and cook for 10-15 minutes until the apples are soft, stirring once or twice.
4. Remove the onion and discard, then mash the sauce a little with the back of a spoon if necessary.
5. Taste the sauce and then add more mustard powder if you want although you may want to leave this until the sauce is cold.
6. Sever cold but not straight from the fridge.
Labels:
Everything Else,
Nigella Lawson,
Nigella's Kitchen,
recipe test,
sauces,
side
23 March 2011
Crumbly Cheese Mash with Leek Butter
Mashed potato is such an all round favourite I was incredibly nervous about messing with the recipe but then I thought everyone loves mash and most people love cheese so the two combined will probably be a winner. And it was - it was good enough that I ended up spooning it straight into my mouth from the bowl at the end of lunch. I thought it was going to be a lot more sickly than it was but instead it was just delicious and I've craved it ever since. I served this with my Roast Pork Belly but it's great on its own with crispy bacon on top.
Now I saw this recipe in a magazine somewhere and I wrote it down... if it's yours I'm sorry for not crediting you but WELL DONE.
CRUMBLY CHEESE MASH WITH LEEK BUTTER
Serves 6
300g floury potatoes, peeled and cut into chunks
2tbsp softened butter
1 small glove of garlic, grated
4 tbsp creme fraiche
600g Wensleydale cheese, chopped into small squares
For the leek butter:
1 leek
140g butter
1. Boil the potatoes in salted water until tender. Drain and either grate or mash. Grating's best but mashing's fine... food processing is just not ok for this.
2. Either while the potatoes are boiling or before you even start cooking your meal, split the leek length ways, trim off both ends and rinse well. Then chop really finely. I was cooking this for Sunday lunch and didn't want to be chained to my stove so I chopped these in the morning and I peeled the potatoes and left them standing in cold water too.
3. Melt the butter and ad the leek and leave this to simmer gently until tender.
4. Once they are cooked put the potatoes back in the pan and place over a very low heat. Add the butter, garlic and creme fraiche and beat with a wooden spoon.
5. Add the cheese a handful at a time and stir, preferably in a figure of eight shape. Season to taste
6. Serve topped with the leek butter.
Possible Vegetables
When we moved into our flat I was determined to become some sort of greenfingered genius. It was I who had insisted on having a garden (so I could get a dog... obviously) so really I was responsible for making it look lovely. Now I wouldn't say I was bad at gardening, in fact I think I'm quite good but I'm a long way from genius. However, what I lack in knowledge I make up for in geeky enthusiasm and I have a garden journal which I try and keep as up-to-date as possible and which I imagine will one day be full to bursting with colourful inspiration and musings that will be published to great acclaim (probably after my death). These dreamy aspirations were quelled somewhat when my husband looked over my shoulder at my page entitled 'Possible Vegetables'. I have wanted a veg box for ages and have only managed to resist so far as I'm pretty convinced there is not one place in the garden that gets enough sun to actually grown any vegetables (well there is but I want to stick a bench there so I can sip tea and bask with my Mumma). My Possible Vegetables page tickled Joe and it has now become an expression in our household that can be used when one of us (usually me) is blathering on about something incomprehensible in a mumbly fashion.
Anyway, we had a mammoth garden weekend last weekend ripping out the back fence and replacing it with tasteful trellis and weaving lots of plants through (with help of neighbours and luckily we already had mature roses and Jasmine just waiting for something to hold onto) and I realised that my time for a veg box is nearing if it's ever going to happen... I really do need to start thinking about possible vegetables now. Any ideas?
22 March 2011
Slow Roast Pork Belly
Now I don't really like pork. I love bacon and ham and sausages but roast pork is always a bit piggy for me. I do, however, love crackling and have been craving it for sometime. I decided that it was time for me to venture into Sunday lunch territory and actually cook some roast pork myself rather than refusing it and then eating all of Joe's crackling (he actually lets me have some... that's true love) whenever he has it.
I'm usually quite a calm cook but this involved several phone calls to the Mumma and a lot of internet and cookery book research and I was so impressed with the result I think I'll cook it more often and be less sniffy about roast pork in general! Of course I used a Nigella recipe but I actually tweaked and simplified it because I was serving this with cheese mash with leek butter and didn't want the pork to battle with that too much. So for a more exciting Pork Belly recipe look to Nigella's Kitchen: Recipes from the Heart of the Home but for a simple, yummy recipe that will go with anything here's my version.
Roast Pork Belly
Serves 6
2.1kg pork belly, without the bone and with the fat pre-scored
5tbsp soy sauce
5tbsp olive oil
Salt
Now I served this with crumbly cheese mash with leek butter, peas, apple sauce, and roasted shallots, carrots, garlic and parsnips but it will really go with whatever you want. You let this sit overnight but when you are ready to cook pre-heat the oven to 150C/300F/Gas Mark 2. I also did more scoring of the fat - it's that that makes cook crackling.
1. The night before whisk together the soy sauce and olive oil in the bottom of a shallow dish that is just big enough to fit your piece of pork. You want this to be surrounding the meat but not touching the fat. Cover with tin foil and put in the fridge over night. You can do this in the morning if you are making it for supper.
2. When you go to pre-heat the oven take the pork out of the fridge put in a roasting tin lined with tin foil and leave out to get to room temperature before it goes in the oven.
3. Cook in the oven at 150C for 4 hours. Turn it around half way if you are that way inclined but I just left it.
4. After the 4 hours turn the heat right up to 250C/480F/Gas Mark 9 and cook for a further 1/2 and hour.
5. Let it stand for 20 mins or so covered in foil. Carve on a board - you can take the fat off and break that up separately or just carve roughly following the score lines. I don't think this is supposed to look perfect anyway.
6. Instead of gravy I just squeezed a bit of lemon juice (less than half a lemon) onto the foil to help get the yummy bits off the foil, scraped it all around a bit and then poured into a jug. Because there wasn't very much I plonked a knob of butter in and put it in the oven for five mins.
I'm usually quite a calm cook but this involved several phone calls to the Mumma and a lot of internet and cookery book research and I was so impressed with the result I think I'll cook it more often and be less sniffy about roast pork in general! Of course I used a Nigella recipe but I actually tweaked and simplified it because I was serving this with cheese mash with leek butter and didn't want the pork to battle with that too much. So for a more exciting Pork Belly recipe look to Nigella's Kitchen: Recipes from the Heart of the Home but for a simple, yummy recipe that will go with anything here's my version.
Roast Pork Belly
Serves 6
2.1kg pork belly, without the bone and with the fat pre-scored
5tbsp soy sauce
5tbsp olive oil
Salt
Now I served this with crumbly cheese mash with leek butter, peas, apple sauce, and roasted shallots, carrots, garlic and parsnips but it will really go with whatever you want. You let this sit overnight but when you are ready to cook pre-heat the oven to 150C/300F/Gas Mark 2. I also did more scoring of the fat - it's that that makes cook crackling.
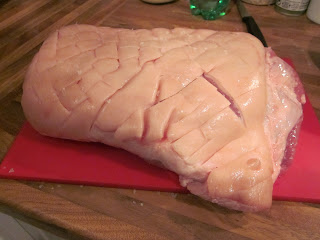
Scored pork ready to marinade |
1. The night before whisk together the soy sauce and olive oil in the bottom of a shallow dish that is just big enough to fit your piece of pork. You want this to be surrounding the meat but not touching the fat. Cover with tin foil and put in the fridge over night. You can do this in the morning if you are making it for supper.
Pork in its marinade |
2. When you go to pre-heat the oven take the pork out of the fridge put in a roasting tin lined with tin foil and leave out to get to room temperature before it goes in the oven.
3. Cook in the oven at 150C for 4 hours. Turn it around half way if you are that way inclined but I just left it.
4. After the 4 hours turn the heat right up to 250C/480F/Gas Mark 9 and cook for a further 1/2 and hour.
5. Let it stand for 20 mins or so covered in foil. Carve on a board - you can take the fat off and break that up separately or just carve roughly following the score lines. I don't think this is supposed to look perfect anyway.
6. Instead of gravy I just squeezed a bit of lemon juice (less than half a lemon) onto the foil to help get the yummy bits off the foil, scraped it all around a bit and then poured into a jug. Because there wasn't very much I plonked a knob of butter in and put it in the oven for five mins.
Labels:
Autumn,
Main Course,
original recipe,
pork,
Sunday lunch
21 March 2011
Mozarella and Parma Ham Tart with Basil
This is incredibly easy and so yummy that whoever you're making it for will be really impressed and you really won't have done anything much. If you were really organised you could make these ahead but you'd need a bigger fridge than I've got and they only take ten mins as it is anyway.
MOZARELLA AND PARMA HAM TART
Serves 4
500g packet puff pastry (I like to roll it myself but you can get pre-rolled if you prefer)
6 vine-ripened tomatoes
6 slices parma ham
125ml olive oil
3 cloves garlic, peeled
1 ball mozzarella (unless you are completely decadent and naughty in which case have 2), drained and torn.
Basil leaves (about 6 or 7)
1 egg, beaten to use as egg wash
Pre-heat the oven to 180C/350F/Gas Mark 4. Now you really can chop the tomatoes and make the garlic oil before... these are basically like pizza's but without all the faffing with the dough.
1. Slice the tops and bottoms off the tomatoes and then cut into reasonably thin slices and lay out on a plate covered in kitchen roll. Then cover the tomatoes with kitchen roll so any excess liquid is absorbed. You don't want soggy tarts.
2. Put the garlic and olive oil in a bowl and bring to the boil, then turn the heat to low and let it cook for 5 minutes or until the garlic is brown. Turn the heat off and set aside.
3. Remove the garlic from the oil and slice. Keep the oil ready for basting the pastry.
4. Roll out the pastry or not if you've got pre-rolled. I use a side plate to measure out 4 circles from the dough (it should be about 3mm thick). Place the circles on greased baking trays (I use reusable baking sheets so I don't have to faff about with butter).
5. Using the tip of a knife and being sure you don't cut through the pastry, make a circle about 1cm from the edge of the pastry disc.
6. Brush the outside of this circle with the egg wash and the inside with garlic oil.
7. Staying inside the border line make a layer of tomato's first and then if you want to be really garlicky add some of the chopped up garlic.
8. Sprinkle over the torn up mozzarella and then do the same with torn parma ham.
9. Cook in the oven for 12-15 minutes (slightly longer maybe, my oven is a bit hot) until the pastry is puffed and golden and everything looks yummy.
10. Sprinkle with torn basil and serve 1 per person with onion jam or something similar.
MOZARELLA AND PARMA HAM TART
Serves 4
500g packet puff pastry (I like to roll it myself but you can get pre-rolled if you prefer)
6 vine-ripened tomatoes
6 slices parma ham
125ml olive oil
3 cloves garlic, peeled
1 ball mozzarella (unless you are completely decadent and naughty in which case have 2), drained and torn.
Basil leaves (about 6 or 7)
1 egg, beaten to use as egg wash
Pre-heat the oven to 180C/350F/Gas Mark 4. Now you really can chop the tomatoes and make the garlic oil before... these are basically like pizza's but without all the faffing with the dough.
1. Slice the tops and bottoms off the tomatoes and then cut into reasonably thin slices and lay out on a plate covered in kitchen roll. Then cover the tomatoes with kitchen roll so any excess liquid is absorbed. You don't want soggy tarts.
2. Put the garlic and olive oil in a bowl and bring to the boil, then turn the heat to low and let it cook for 5 minutes or until the garlic is brown. Turn the heat off and set aside.
3. Remove the garlic from the oil and slice. Keep the oil ready for basting the pastry.
4. Roll out the pastry or not if you've got pre-rolled. I use a side plate to measure out 4 circles from the dough (it should be about 3mm thick). Place the circles on greased baking trays (I use reusable baking sheets so I don't have to faff about with butter).
5. Using the tip of a knife and being sure you don't cut through the pastry, make a circle about 1cm from the edge of the pastry disc.
Pastry base with very wonky guideline - just because I don't want you to feel pressured obviously |
6. Brush the outside of this circle with the egg wash and the inside with garlic oil.
7. Staying inside the border line make a layer of tomato's first and then if you want to be really garlicky add some of the chopped up garlic.
8. Sprinkle over the torn up mozzarella and then do the same with torn parma ham.
Tarts pre-oven |
9. Cook in the oven for 12-15 minutes (slightly longer maybe, my oven is a bit hot) until the pastry is puffed and golden and everything looks yummy.
10. Sprinkle with torn basil and serve 1 per person with onion jam or something similar.
Finished tart |
Labels:
basil,
lunch,
Main Course,
original recipe,
parma ham,
pastry,
Quick
17 March 2011
A Bit of Culture
If you are that way inclined or indeed, feel that you should be more that way inclined my sibling's work is in an exhibition opening this weekend at the Transition Gallery in Hackney. It is called Gilding the Lily and you should go because all the cool kids are doing it and it will make you a better person.
The Lesson is Fallout Shelter is Need Everywhere by Jessica Holmes |
7 March 2011
Inoffensive Fruit Salad
Now I really don't like fruit - don't like the taste of it, the smell of it, hate touching it but I know that I am in a minority so when I made brunch a few weeks ago I knew it was going to be a necessity. However, I also knew that I would probably vom if there was a fruit bowl on the table and people were just eating it willy-nilly and not sticking to the rules (people who eat bananas and leave the stringy bits lying around HOW DARE YOU?) So i decided to get some fruit that I find least offensive and make a glamorous fruit salad that I could deal with.
It all went very well until I just got a little grossed out and Joe had to finish it but I directed and that's important too!
INOFFENSIVE FRUIT SALAD
Serves 4 (easily)
500g strawberries
2 ripe mangoes
1 tub/box/punnet/thing blueberries
1 lemon
A bit of sugar
I made this in a crystal bowl I got for my christening. A bit swanky for brunch I know but a) when am I ever going to use it otherwise? and b) it fitted and made the fruit look yummy (even to me).
1. Remove all the green gross bits from the strawberries and cut them into quarters. Put them straight into your serving bowl of choice.
2. Cut the mango into cubes. They have a big stone in the middle so you but round the middle length ways a bi like you would a avocado but you have to slice it completely off the flat stone. Then you most of a half of fruit still in the skin so you cut it into cubs with a knife, invert the skin to make it look like a hedgehog and then cut each cube off individually. I haven't explained that very well have I. I shall get Joe to comment below with a more normal explanation. Anyway, plonk the cubes in with the strawberries.
3. Tip the blueberries on top and mix with salad tongs.
4. Squeeze over the juice of half a lemon and sprinkle over a tablespoon (ish) of sugar, mix the fruit together and taste. You may want to add more lemon, more sugar or even a bit of orange juice which just sweetens the whole thing rather nicely.
I actually tried a bit and it was quite nice - Joe got to have the leftovers for breakfast the next day which made me feel like a good wife.
It all went very well until I just got a little grossed out and Joe had to finish it but I directed and that's important too!
Joe finishing the fruit salad - he'll be cross he's got his glasses on in this photo |
INOFFENSIVE FRUIT SALAD
Serves 4 (easily)
500g strawberries
2 ripe mangoes
1 tub/box/punnet/thing blueberries
1 lemon
A bit of sugar
I made this in a crystal bowl I got for my christening. A bit swanky for brunch I know but a) when am I ever going to use it otherwise? and b) it fitted and made the fruit look yummy (even to me).
1. Remove all the green gross bits from the strawberries and cut them into quarters. Put them straight into your serving bowl of choice.
2. Cut the mango into cubes. They have a big stone in the middle so you but round the middle length ways a bi like you would a avocado but you have to slice it completely off the flat stone. Then you most of a half of fruit still in the skin so you cut it into cubs with a knife, invert the skin to make it look like a hedgehog and then cut each cube off individually. I haven't explained that very well have I. I shall get Joe to comment below with a more normal explanation. Anyway, plonk the cubes in with the strawberries.
Joe's mango hedgehog - you can see the other bit of mango on the work surface if that helps! |
3. Tip the blueberries on top and mix with salad tongs.
4. Squeeze over the juice of half a lemon and sprinkle over a tablespoon (ish) of sugar, mix the fruit together and taste. You may want to add more lemon, more sugar or even a bit of orange juice which just sweetens the whole thing rather nicely.
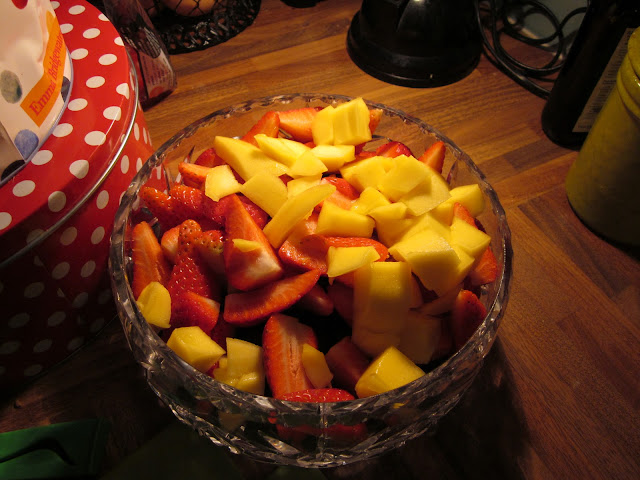
Finished fruit salad |
I actually tried a bit and it was quite nice - Joe got to have the leftovers for breakfast the next day which made me feel like a good wife.
4 March 2011
The Hungover Cookbook
My darling friend Florence bought me The Hungover Cookbook just out of the blue (probably because I spent a lot of time moaning to her about being hungover) and it is the most lovely thing I've received in ages. Anyone stuck for a present get this. Not only are the recipes yummy but it actually works - you can lie in your dark room peering at this, discovering what kind of hangover you have and then seeing what tickles your fancy. Even when I don't think I could eat a thing something always manages to drag me to the kitchen and frankly some of the recipes I dribble over when I haven't touched a drop for days (cheese and red onion toastie anyone?)
Based on the hangovers as outlined by P.G. Wodehouse's Bertie Wooster in The Mating Season (the Broken Compass, the Sewing Machine, the Comet, the Atomic, the Cement Mixer and the Gremlin Boogie) there is a section on each and a selection of recipes (again inspired by Bertie) depending on which you are diagnosed as having. Now this book has been criticised and I can see why - I mean we've all had hangovers where we can't imagine doing anything than rather pathetically prodding at an egg in a frying pan and trying not to be sick - but I have to say the older I get the more I feel the need not to be wasting the day and this gives me a little mission that makes me feel like I've accomplished something - even if it is shouting and throwing things at my husband until he brings me breakfast in bed whilst telling me it's fine to talk rather boringly about myself to someone I barely know for five hours until they manage to drag themselves away.
3 March 2011
Hangover Cure
I don't drink white wine. Mostly because after a glass of it I start pointing in people's faces and telling them what I think I think of them which is actually nothing to do with anything based in reality, and partly because it makes me feel so dreadful during the night and the day after. Last night I drank white wine. I thought I'd sidestepped the dreadful nausea by having spritzers but I woke up in the middle of the night feeling sick and craving cream cheese. So for the first time in over a year (due to my continuing quest for thinness) I had my number one hang over cure... well it's actually the runner up due to the stupid bagel shop no longer stocking pastrami so I now have to have ham, but here it is.
Hangover Cure
1 bagel (I like plain but you can have whichever you want but I think plain is best), toasted
More cream cheese than is healthy for you.
Pastrami
Pickled cucumber/gherkin
Black pepper
The cream cheese has got to ooze out of the sides and the middle and the gherkins should be the sour kind ideally. I get a lot of comments about how weird this is to eat so early in the morning but if you have to get up and go to work this is the only way to get through.
Labels:
Everything Else,
hangover,
original recipe,
Snacks & Canapes
Subscribe to:
Posts (Atom)
©
Blue Sky and Bunting. All rights reserved.