14 August 2014

Nigella Lawson's Italian Apple Pie

We've unpacked my cookery books! Finally after months of having to cook from memory I'm able to try out the huge list of recipes I've flagged for testing. One of the books I was really looking forward to getting my hands one was Nigellissima: Instant Italian Inspiration and so when I decided to have my family for a summer supper in the garden I cooked two recipes from it. The first was a pasta dish which was perfectly nice but needed some tweaking (in my opinion). The other recipe was this Italian Apple Pie which I did at the last minute realising I'd forgotten about pudding and I had some apples that needed using up.

I was really focussed on the pasta and indeed so focussed that I was happily gossiping outside not realising that the alarm was going off to let me know the pie was reading - meaning it had a few charred patches. A disaster I thought, bin it immediately. However, I was persuaded to serve it and I am so glad it was saved from the bin. It was incredibly delicious and unusual and actually very light for what is basically a cake (the sponge was so good I'm going to use this method for other cakes) and great with double cream (and strawberries on the side) for a pudding or indeed with a cup of coffee as elevenses, It is incredibly easy to make and Ned loved it so much that he learnt to say 'cake'!

Italian Apple Pie

Serves 8

100g soft unsalted butter, plus more for greasing
250g plain flour
2 tsp baking powder 
pinch of salt
150g caster sugar
2 eggs
zest 1 unwaxed lemon
1 tsp vanilla extract
75ml full fat milk, at room temperature
3 pink lady apples, or any crisp eating apples (approx 500g in total)

You will need to grease a 22/23cm springform cake tin and line the bottom with baking parchment. Pre-heat the oven to 200C/Gas Mark 6/400F.

1. Into a food processor put the flower, baking powder and a pinch of salt, 100g soft butter, caster sugar, eggs, lemon zest, and vanilla extract, and blitz until it forms a thick smooth batter. Then, with the motor still running, pour the milk gradually down the funnel to lighten the mixture.

2. To do this by hand, beat the butter and sugar together until pale and creamy, then beat in the eggs, followed by the flour, baking powder, salt, vanilla, lemon zest, and milk until you have a batter with a soft dropping consistency.

3. Halve 1 of the apples, the peel, core and chop one half into approximately 1cm cubes, add these to the batter and either pulse to mix, or beat in. Pour your batter into the springform tin.

4. Quarter and core the remaining apples (including the unused half apple), leaving the skin on, then finely slice them and arrange in concentric circles (or how you can) on top of the cake batter.

5. Mix together the brown sugar and cinnamon and sprinkle this over the apples, then bake for 40-45 minutes, by which time the cake should be risen and golden. Piece with a metal skewer, should have only a few crumbs sticking to it when removed.

6. Leave to cool for 1 hour, before springing it out of the tine to cut and serve warm, or leave to cool completely once out of the tin
SHARE:

8 February 2013

Lamb Ragu

I'm not a huge fan of lamb, as you'll see if you click on 'Lamb' in the cloud on the right. However, in my frenzy to cook as much as possible from Nigellissima: Instant Italian Inspiration and because the picture looked so damn yummy I decided to try  out her Lamb Ragu. She also describes it as one of her 'go to weekday suppers' and well, I was having friends to supper, it was a Thursday, I thought I'd give it a try. Typically it was the picture that made me want to cook, and eat, this recipe and what with feeding the baby, putting him to bed, cooking and drinking vast amounts of wine I forgot to take a picture. I'll add one next time I cook it. And there will be a next time.

Nigella always bangs on about these exciting types of pasta that I vow to get next time I'm near anywhere that sells such a thing but I always end up ordering online from Sainsburys, so instead of the mafaldine or pappardelle that the recipe requires, I used good old tagliatelle and it worked just fine.This is a great alternative to normal bolognaise as the lamb mince can be in the freezer and everything else is store cupboard stuff. I have to admit that I left off the fresh mint and I'm not a huge fan and added a squirt of tomato ketchup towards the end of cooking as I felt it needed a little sweetness... whether you decide to do that or not is up to you.

Lamb Ragu

Serves 2

1 ½ tbsp garlic oil
1 banana shallot, chopped
1 tsp dried mint
1 tsp dried oregano
¼ tsp dried chilli flakes
250g minced lamb
1 x 400g can chopped tomatoes
2 tsp redcurrant jelly
1 ½ tsp Worcestershire sauce
salt
pepper
200g mafaldine or pappardelle (or whatever pasta you can find)
Fresh mint, to serve (optional)

I doubled the quantities and cooked this in a round le creuset but a heavy bottomed saucepan with a lid would do just as well. Whatever you usually put your bolognaise in basically. I also cooked this on a low heat for about double the amount of time because that was easier when you have people coming over.

1. Put a large pan of water on to boil, then warm the garlic oil in a small, heavy-based pan (with a lid) and cook the shallots, stirring, for 2 minutes.

2. Sprinkle in the herbs and chilli, stirring again in the hot pan before adding the mean and cooking for a couple of minutes, stirring to break it up with a wooden spatula or spoon until it loses a bit of the pinkness.

3. Add the tomatoes, redcurrant jelly, Worcestershire sauce, pinch of salt and some grindings of pepper, give it a good stir and bring to the boil, then partially cover with the lid and simmer for 20 minutes.

4. Salt the pasta water and cook the pasta according the instructions, and your taste.

5. Once the pasta is cooked, and not too efficiently drained, return the pasta to the pan and dress it with the ragu. Spinkle a little fresh mint and serve.
SHARE:

15 January 2013

Meatzza


My husband has never been able to pronounce things correctly. So much for his university education. When I met him he would say burlesque to rhyme with barbecue, it was only a couple of years ago I sorted out the Arkansas problem for him and literally months ago that we had a sit down discussion about reneged having a hard ‘g’. I thought it was all over but no, thanks to Nigella and her lovely new book Nigellisima I now have to deal with regular requests for the ‘Meatatza’. He means Meatzza. 

On second thoughts maybe this annoying inability to pronounce quite a simple word was a deliberate ploy to get me to cook it so we could move on. It worked. I cooked it for our romantic Friday night that I’d been planning involving booze and a new Midsommer Murders that actually ending up being me and Most Haunted while Joe wolfed his Meatzza and returned to his computer to get his award for slowest. Worker. Ever.

A quick word on Nigella’s latest series – loved it. Far less simpering and saucy sideways glances, amazing figure, amazing clothes, updated fab makeup and yummy recipes. A big improvement (although I did watch and love Kitchen she was a bit OTT wasn’t she?). And the accompanying book is just lovely – completely different to her usual look and easy to follow.

Now for the Meatzza which she says is the most requested recipe in the book. It was delicious and very simple to make but kind of hefty. Admittedly the recipe is for 4-6 people and there are only two of us, and yes we did finish it (see my constant twitter complaints about how I’m not losing weight even though I’m breastfeeding). But on its own for 4-6 people I feel it would need something with it – salad or tagliatelle perhaps?

Also would like to add that mince doesn't photograph well... I tried.

Meatzza

Serves 4-6

500g minced beef
3 tbsp grated Parmesan
3 tbsp breadcrumbs or porridge oats (not instant)
3 tbsp chopped fresh parsley
2 eggs, lightly beaten
1 clove garlic, peeled
salt and pepper to taste
butter, for greasing
1 x 400g can chopped tomatoes
1 tsp garlic oil
1 tsp dried oregano
1 x 125g ball of mozzarella (not Buffalo), halved then sliced
few leaves fresh basil

Preheat the oven to 220C/425F/Gas Mark 7. You'll need a large mixing bowl and a round baking tin,  although I used a round Le Creuset, about 28cm in diameter. I didn't add enough salt, do not be afraid of salt in this recipe, it is your friend, if in doubt heat up a small frying pan and fry off a tiny bit of the mince mixture to try it for seasoning.

1. In a large bowl, using your hands, combine the mince, Parmesan, breadcrumbs, parsley and eggs. Grate in the garlic and add some salt and pepper. Do not overwork it, just lightly mix together, or the meat will become compacted and dense. 

2. Butter your dish or baking tin and turn the meat into it, pressing the mixture lightly with your fingers to cover the bottom of the dish. 

The mince base

3. Make sure you've drained as much juice as you can from the chopped tomatoes, then mix the tomatoes with the garlic oil, oregano and some salt and pepper and spread, using a rubber spatula, lightly on top of the meat base. Arrange the mozzarella slices on top.


4. Cook for 20-25 minutes by which time the meat should be cooked through and the mozzarella melted. 

5. Remove from the oven and let it sit for 5 minutes then cover with the basil leaves and cut into wedges like a pizza to serve.


SHARE:

21 September 2012

Instant Chocolate Mousse

Although I don't really have a sweet tooth normally I am always a fan of chocolate mousse. Typical then that, now I'm pregnant and only want sweet things, chocolate mousse is often off the menu as it contains raw egg. Thank goodness (as usual) for Nigella Express which has this recipe in for an extra quick, egg free chocolate mousse. I can see this being a pretty permanent fixture in my fridge for the next 7 or so weeks. It seems to be really liquid when you decant it but once it's set in the fridge it has an amazing thickness. I like it best with a good dollop of double cream.

Instant Chocolate Mousse

For 4-6

150g mini marshmallows
50g soft butter
250g good dark chocolate (minimum 70% cocoa solids) chopped into small pieces
60ml hot water from a recently boiled kettle
1 x 284ml tub double cream
1 tsp vanilla extract

1. Put the marshmallows, butter, chocolate and water into a heavy-based saucepan.

2. Put the saucepan on the hob, over heat, though keep it fairly gentle, to melt the contents, stirring every now and again. Remove from the heat.

3. Meanwhile, whip the cream with the vanilla extract until thick, and then fold into the cooling chocolate mixture until you have a smooth cohesive mixture.

4. Pour or scrape into 4 glasses or ramekins, about 175ml each in capacity, or 6 smaller ones and chill until you want to eat.


SHARE:

19 July 2012

Devil's Food Cake

My sweet tooth continues to rage and having watched Nigella make this on tele the other night I decided to give it a go. It is delicious although I would advise cooking for 25 mins max (rather than the 30 she advises) so it's as gooey as possible. The top on mine was a bit hard and detracted someone from the vast amounts of icing on the rest of the cake! The recipe is in Kitchen: Recipes from the Heart of the Home (although I'm sure I was watching it on an older programme of hers). A little of this goes a long way as it's really rich - I think it would be extra nice with some double cream but for some that may be a step too far.

I've reorganised the way she does this so the icing comes first - I ended up having to put mine in the fridge as it was still too runny to spread on the cake after an hour and a half. 

Devil's Food Cake

For the cake:
50g best-quality cocoa powder, sifted
100g dark muscovado sugar
250ml boiling water
125g soft unsalted butter, plus some for greasing
150g caster sugar
225g plain flour
½ tsp baking powder
½ tsp bicarbonate of soda
2 tsp vanilla extract
2 eggs

For the frosting:
125ml water
30g dark muscovado sugar
175g unsalted butter, cubed
300g best-quality dark chocolate, finely chopped

Pre-heat the oven to 180C/350F/Gas Mark 4. Line the bottom of two 20cm sandwich tins (not springform or loose bottomed - this batter is very liquid) with baking parchment and butter the sides.

1.  Make the icing by putting 30g muscovdo sugar and 175g butter in a pan over a low heat to melt. When the mixture begins to bubble, take the pan off the heat and add the chopped chocolate, swirling the pan so that all the chocolate is hit with heat, then leave for a minute to melt before whisking till smooth and glossy.

2. Leave for at least an hour, whisking now and again when you are passing by the pan.

3. For the cake - put the cocoa and 100g dark muscovado sugar into a bowl with a bit of space to space, and pour in the boiling water. Whisk to mix, then set aside.

4. Cream the butter and caster sugar together, beating well until pale and fluffy. Nigella uses her freestanding kitchen aid mixer, I used my magimix, you can use either... or your arms!

4. While this is going on - or as soon as you stop if you are mixing by hand - stir the flour , baking powder and bicarb together in another bowl and set aside for a moment.

5. Dribble the vanilla extract into the creamed butter and sugar - mixing all the while - then drop in 1 egg, quickly followed by a scoopful of the flour mixture, then the second egg.

6. Keep mixing and incorporate the rest of the dried ingredients for the cake, then finally mix and fold in the cocoa mixture scraping the bowl well with a spatula.

7. Divide the batter between the two prepared tins and put in the oven for about 30 mins (I think 25 max) or until a skewer comes out clean when put through the middle of the cake.


8. Take the tins out and leave them on a wire rack for 5-10 mins, before turning the cakes out to cool.


9. Once the cakes are cool enough and the icing ready to spread, set one for the cooled cakes, with it's top side down, on a cake stand or plate (I use the lid of my cake tin so the tin itself can go over the top), spread with about a third of the icing, then top with the second cake, regular way up, and spread the remaining frosting over the top and sides. The cake should keep for 2-3 days in an airtight container in a cool place.


To make ahead: The cake layers can be baked 1 day ahead and assembled before serving: wrap tightly with clingfilm and store in an airtight container.

Freezing: Un-iced cake layers can be frozen on the day of baking, each wrapped in a double layer of clingfilm and a layer of foil for up to 3 months. Defrost for 3-4 hours on a wire rack at room temperature.
SHARE:

6 June 2012

Macaroni Cheese De Luxe

This has to be in my top five all time favourite things to eat and now I've tried this recipe I won't really use anything else. It's quite time consuming and it makes enough for an army but that's fine by me. I can spend a lot of time testing the cheese sauce is just right and then have loads of individual portions in the freezer so I can eat this whenever I want. Perfect!

This recipe is from Nigella Christmas: Food, Family, Friends, Festivities as part of her Christmas Eve supper for 10-12 people. It is fantastic to have in the freezer over Christmas and New Year for those days when you are too exhausted to cook and to soothe the night before the dreaded return to work. I know that there is a quicker version in Nigella Express and maybe, for sake of comparison, I will do that one next time but for those who want the ultimate Macaroni Cheese recipe this is it. Sometimes i crisp up some Oscar Meyer bacon and sprinkle  it in when I pour the sauce over the pasta but really it doesn't need it.

Unless you have a huge oven dish (Nigella recommends 36cm x 26cm x 6cm deep) you will need two or three - I can just about fit all of this into my two largest ones. You will need two large saucepans too - one for the pasta and one for the sauce - I have to do my macaroni in two batches which is slightly annoying.You can serve this with salad if you wish... I don't think it really needs it.

Macaroni Cheese De Luxe

For 10-12

175g soft butter, plus more for greasing
150g plain flour
2 tsps Dijon mustard
3 x 170g cans evaporated milk, 500ml total
1.5 litres semi-skimmed milk
2 x 500g packets macaroni
275g Emmental, chopped or grated
300g red Leicester or Cheddar, chopped or grated
75g Parmesan, chopped or grated
salt

Quite often I find that Emmental comes in smaller packets of 240g and cheddar in 350g so I just use all of those to make up the difference. I actually find the taste is a bit better as I get the strongest cheddar I can find...

Pre-heat the oven to 220C/425F/Gas Mark 7 and grease your roasting dish with butter.

1. Start heating a large pan full of water on the hob for the pasta.

2. Put another pan (with a lid), though not quite as big, to heat on the hob for the cheese sauce; melt the butter over a medium/low heat, add the flour, stirring until you have formed a roux. Cook, still stirring, for 5 minutes over a low heat.

Roux


3. Add the Dijon mustard to the pan and stir well, then take off the heat.

4. Pour the evaporated milk and the fresh milk into a jug and slowly whisk this into the roux. Be patient or you will get lumps.

White sauce


5. When you have whisked in all the liquid, put the pan back on the heat and cook, stirring with a wooden spoon, for about 10-15 minutes, or until the flouriness has gone.

6. When the sauce is ready, add the chopped or grated cheeses (reserving a handful). Stir until the cheese has melted, season to taste and take off the heat, with a lid so no skin forms.

7. Meanwhile when the water from the first pan has come to the boil, salt it extravagantly and cook the macaroni for a couple of minutes less than directed on the packet and drain.

8. Tip the drained pasta into the prepared dish and scrape the cheese sauce on top. If you are going to add bacon bits, do so now. With a couple of spatulas or your wooden spoon mix together until the pasta is coated in the sauce.

Cling-filmed macaroni ready for the cheese


9. Sprinkle over the reserved cheeses and transfer to the oven to cook for 15-20 minutes or until the top has scorched slightly and the underneath is bubbling. This is best left to stand for 20 minutes or so out of the oven before serving.

Macaroni Cheese
Finished macaroni cheese


To make ahead: Get to the end of stage 8, cool. cover with clingfilm and keep in the fridge for up to 3 days. When ready to cook, preheat the oven to 200C/400F/Gas Mark 6. Remove the macaroni from the fridge while the oven is heating and cover with foil. Place the dish in the oven for 20 minutes, then uncover, sprinkle over the reserved cheeses and reheat for a further 20-30 mins until piping hot and golden.

To freeze: Get to the end of stage 8, cool, cover and freeze for up to three months. Thaw overnight in the fridge and reheat as above.
SHARE:

10 February 2012

Pomegranate Ice Cream

When I made pomegranate vodka I then had lots of leftover juice so I immediately made one of my favourite things to have in the freezer in case I need an exciting pudding at the last minute - Nigella's No Churn Pomegranate Ice Cream from Nigella Express. This is yummy, almost sherberty and a must for anyone who has a weakness for cream and sugar together.


No Churn Pomegranate Ice Cream 

Serves 8

2 pomegranates (plus seeds from a third for decoration if you want)
1 lime
175g icing sugar
500ml double cream

Now I used the leftover juice from making the vodka and as I have this to put in the freezer for emergencies I don't bother with the seed decoration bit. You need an airtight container for this I use a couple of leftover takeaway boxes so they fit into the freezer easily and you don't have to worry about the whole lot defrosting and refreezing.

1. Juice the pomegranates and the lime and strain into a bowl.

2. Add the icing sugar and whisk to dissolve.


3. Whisk in the double cream and keep whisking until soft peaks form in the pale pink cream.

4. Spoon and smooth the ice cream into the airtight container of your choice and freeze for at least 4 hours, or overnight.


5. Scatter with some pomegranate seeds before you eat it.
SHARE:

7 February 2012

Pomegranate Vodka

This is a delicious present, really easy to make and although pomegranates are expensive I'm going to follow up with another recipe for Pomegranate ice cream so you use everything you can from the fruit and get maximum output. Both these recipes are by Nigella but they are from different books. This one is from Nigella Christmas: Food, Family, Friends, Festivities and although it's quite messy, it is really easy to make.

You need to have a 1 litre kilner or sealed jar to store the vodka in and then some bottles to bottle it into. You can use the empty vodka bottles with the label removed but I get my bottles from Lakeland because I LOVE IT. Nigella says she can get pomegranate seeds from her local supermarket. Well I couldn't so I bought them from my local market which did 2 for £1 which is much better than the £1.50 for one in the supermarket. I then tapped out the seeds into a sieve so I've added that bit to the recipe. You will need to wear a pinny...

Pomegranate Vodka

Makes 700ml

150g pomegranate seeds (about 1-2 pomegranates)
1 x 70cl bottle of vodka

You will need to sterilise your storage jar but this is going to steep for 4 days so you don't need to sterilise your bottle until you need it. I used a sieve lined with a muslin over a measuring jug for this.

1. Cut your pomegranate in half, hold it over your muslined sieve and whack the back of it with a wooden spoon. I then push them around in the sieve to get all the juice off - they need to be thoroughly drained.
Pomegranate seeds


2. Add the pomegranate seeds to the cooled, prepared jar, followed by the vodka. Keep the pomegranate juice to either make ice cream or to drink.

3. Seal the jar and give it a shake before putting it in a cool, dark cupboard, or anywhere out of the light.

4. Leave it for four days, shaking it any time you remember to, before sieving it into a measuring jug.

Pomegranates after four days


5. Sterilise your bottle, pour in the steeped vodka and put the lid on tightly before storing.

6. This will keep for up to 1 year.
SHARE:

20 January 2012

Mortadella Pasta Salad

The last of the salads for my studio picnic with my sister and the last from Nigella Express. I love this - I thought it was going to be a bit bland and dry (and lacking in mayo) but it was delicious and, even though I hate lemon, the lemon juice here is absolutely necessary and not at all too lemony. Although it used Mortadella it would work well with any kind of ham you can get hold of or even bacon... but then pretty much everything works with bacon. In fact, this pasta salad is a great basis for everything as you can have most of it in the fridge. I've taken to buying the pre-grated Parmesan because it's so useful for things like this and soups so in fact I only need to get the ham - I think I'll make this next time I have ham leftovers. Delicious!

Mortadella Pasta Salad

Serves 4 as a packed lunch

250g fusilli
2 tbsp extra virgin olive oil
2 tbsp lemon juice
1 tsp Maldon salt or 1/2 tsp table salt
1/2 tsp mild German mustard, or similar
1 thick slice (approx 150g) mortadella, diced into 5mm squares
20g curly parsley, finely chopped
25g Parmesan flakes
salt and pepper to taste

I didn't have German mustard so I used good old grainy and it worked just fine. I also hate curly parsley and never see the need for it so I used flat leaf.

1. Put the pan of water on to boil, add the salt to taste, and then cook the pasta following the packet instructions.

2. Meanwhile whisk together the oil, lemon juice, salt and mustard to make the dressing.

3. Drain the cooked pasta and tip it into a large bowl, pour over the dressing and toss well to coat.

4. When cool, stir in the mortadella pieces, chopped parsley and Parmesan flakes. Check the seasoning, adding salt and pepper as required.

SHARE:

14 January 2012

Vietnamese Pork Noodle Soup

Another one of Joe's choices for this weeks big shop. It was incredibly easy to make, soothing and tasty. I think next time I make it I may tweak it a little - I felt the broth was missing a little something that I can't put my finger on at the moment. Not that this should deter you from trying this recipe out and maybe you will let me know what you think if you do.

This comes from Kitchen: Recipes from the Heart of the Home - I still feel like I've only scratched the surface of what this book has to offer. What I love about this recipe is the use of pork fillet, which I have to confess to never using before. I'm not a huge pork fan but this was tasty and easy and really cheap compared to my usual beef. £4 something for nearly 500g so I cut it all into strips and put the remaining bits in freezer bag ready for the next batch of this. I think next time I will probably use straight-to-wok noodles and add them to the soup in the wok rather than cooking noodles separately.

Vietnamese Pork Noodle Soup

Serves 4

275g pork fillet, cut into thin discs and then fine strips
2 tbsp lime juice
2 tbs soy sauce
1/2 tsp paprika
2 tbsp fish sauce
250g ramen noodles
1 tbsp garlic oil
6 thin or 3 fat spring onions, finely sliced
1 tbsp chopped fresh ginger
1 litre chicken stock
300g beansprouts
175g baby pak choi, torn into pieces
2 tsps chopped red chili

All you need for this (apart from a chopping board and a sharp knife) is a saucepan to cook the noodles in and a wok or deep heavy-based frying pan. I'd advise doing all the chopping and weighing out of ingredients first then cooking the soup itself will be a matter of minutes.

1. Put the strips of pork fillet into a bowl and add the lime juice, soy sauce, paprika and fish sauce, but don't let this stand for more than 15 minutes.

2. Cook the noodles according to packet instructions and then refresh in cold water.

3. Heat a wok then add the garlic oil and fry the spring onions and ginger for a minute or so. Add the pork and its liquid to the wok, stirring as you go.

4. Cook the meat in the pan for another two minutes, then make up the chicken stock with boiling water, add the hot stock to the pan and bring to the boil.

5. Check the pork is cooked through, then add the beansprouts and baby pak choi. Add water if the soupy base has evaporated too much - about 125ml of freshly boiled water should do the trick, but you may not need it.

6. Arrange the drained noodles equally in warmed bowls, ladle over the pork and vegetables and finally the soupy stock. Scatter the chopped chili on top and serve.

Finished soup (without the red chilli)
SHARE:

12 August 2011

Coq au Riesling

The thing about occasionally feeling miserable is it's hard to motivate yourself to plan what to cook for a dinner party. I was so bad on Sunday night that Joe resorted to scouring through our cookery books to see if anything was easy and appealing and came across this fantastic recipe in Nigella Express. The most strenuous part of this recipe is the chopping of the chicken and it's incredibly tasty and really soothing actually which is just what I needed. I served it with garlicky, buttered tagliatelle.

Nigella suggests that this would be at it's best if you let this get cold and then reheat it the next day which is what I would have done if I was more organised and hadn't spent my time lying around on the sofa being morbid.

Coq au Riesling

Serves 6

2 tbsp garlic oil
150g pancetta
1 leek, finely sliced
12 boneless, skinless chicken thighs
3 bay leaves
300g oyster mushrooms, torn into strips
1 x 75cl bottle Riesling
double cream
salt and pepper
1-2 tbsp chopped fresh dill
Loads of chicken - chopped by Joe

I made this is a large oval le creuset casserole which was great as it could go straight on the table when it was ready - but you basically just need a big pot with a lid. As I wanted to do minimal shopping I used what chicken I had in the freezer which was 8 boneless chicken thighs and 4 chicken breasts and it was fine. We also couldn't find oyster mushrooms so we just used normal ones quite thinly sliced. This is great for a dinner party because once it's cooked you can either keep it on a really low heat keeping warm.

1. Heat the oil in your pot and fry the pancetta until crisp.

2. Add the sliced leek and soften it with the pancetta for a minute or so.

3. Cut the chicken into pieces (2 or 3 for the thighs, a few more for breasts), tip into the pan, add the bay leaves, mushrooms and wine.

Pre-Simmering
4. Season with salt and pepper to taste and bring to the boil. Cover the pan and simmer gently for 30-40 minutes, stirring in the double cream for the last couple of minutes.

Post-Simmering
5. Sprinkle with dill and serve.

Nearly ate it all before I remembered to take a photo

SHARE:

18 July 2011

Nigella's Spanish Chicken with Chorizo and Potatoes

As part of my Kitchen: Recipes from the Heart of the Home frenzy I cooked this the other night (actually to go with the Banoffee Cheesecake pudding) and it was yummy delicious in every way and highly recommended because it's incredibly easy, if slightly expensive which is fine really because it tastes amazing enough to be great for dinner parties but is just so simple to make that you can actually have a drink with your guests when they arrive rather than slaving in the kitchen (shock horror!). This makes a lot of food too so you get yummy leftovers for lunches the next day so really you are getting a couple of meals for your money.

What was so fantastic about making this with the cheesecake was that the pudding was made the night before and only had to be unleashed from its springform tin and drizzled with toffee sauce half an hour before we wanted it and the chicken and chorizo can be wedged in its tins covered with clingfilm and ready to go in the fridge so you only need to drizzle with olive and put in the pre-heated oven.

SPANISH CHICKEN WITH CHORIZO & POTATOES
Serves 6

2tbsp olive oil
12 chicken thighs, skin on, bone in
750g chorizo sausages, ideally the baby cooking ones
1kg new potatoes, halved
2 red onions, peeled and roughly chopped
2 teaspoons dried oregano
grated zest of 1 orange ( I do not include this - I'm sure it's yummy but no...)

Preheat the oven to 200C/Gas Mark 7. You will need two shallow roasting trays.

1. Put the oil in the bottom of the two roasting tins, 1 tbsp in each. Rub the skin of the chicken in the oil, then turn them skin side up, 6 in each tin.

2. Divide the chorizo sausages and new potatoes between the two tins. Sprinkle the onion and oregano over and, if you are using it, grate over the orange zest. As I don't use the orange juice I just gave a little extra drizzle of olive oil over it before I put it in the o

OK so raw chicken is never going to look that appealing

3. Cook for 1 hour, swapping the trays round and basting after 30 minutes.

This is minimum input maximum output and the left overs are to die for - I followed Nigella's instructions and made quesadilla's which were just fantastic. Dice up the leftovers, add some grated cheese (I use cheddar), cover half a tortilla with the mixture, fold in half and then griddle or fry. This is fantastic for a hangover.

I meant to take a picture of it daintily cut in half - but I ate it too fast
SHARE:

1 July 2011

Mortadella and Mozarella Frittata

This was a fantastic supper for when you've possibly been the pub for a couple of large glasses of rose and then realise that you need to make supper for a couple of your friends. It would of course work with any ham and any cheese but this is a really fantastic combination and both can be in your fridge ready for a frittata emergency.

As you can probably tell I've been on a bit of a Nigella's Kitchen: Recipes from the Heart of the Home binge - this is not going to turn into a Nigella blog but I looked through her book just before going to Sainsburys and so ended up getting lots of ingredients for her recipes...

MORTADELLA AND MOZARELLA FRITTATA RECIPE
Serves 4-6

6 eggs
125g mortadella. chopped
125g mozzarella, chopped
1 tbsp chopped parsley
1 tbsp freshly grated Parmesan cheese
Salt and Pepper
1 tbsp butter
a drop of garlic oil

1. Turn on the grill so it can get hot. Beat the eggs in a bowl, then add the chopped or diced mortadella and mozzarella.

2. Whisk in the parsley, Parmesan, salt and pepper. Be careful with the seasoning - the ham and mozzarella are both quite salty.


3. Heat the butter and oil in a frying pan (with oven proof handle) or cast iron skillet and once it's hot and foamy add the omelette mixture.


4. Cook for about 5 minutes over a gentle heat without stirring, until the frittata is set underneath and golden.

5. Transfer the pan to the hot grill (keeping the handle away from the heat) and cook the frittata until it is set on top - don't leave the pan unattended as this can happen quite quickly, and remember to wear oven gloves to remove the pan.

mortadella and mozarella frittata
6. Leave it to stand for a couple of minutes, then run a knife or spatula round the edge of the frittata and ease it out of the pan, keeping it the same way up, onto a board or plate.

7. Cut into triangle like a cake, then sprinkle with extra parsley and serve with salad.
SHARE:

25 June 2011

Nigella Lawson's Banoffee Cheesecake

3.15am is no time to be fretting about a cheesecake and I really don't recommend it, however this is a recipe you need to make the night before so take note of that before you embark upon it at 11pm having been delayed by your slightly time-irresponsible other half. It is pretty smug-making when it works though and isn't actually as difficult as many people imagine so well worth a try if you have crazy banana loving freaks coming to your house (banana's are the fruit of evil).

The recipe is from Kitchen: Recipes from the Heart of the Home - which I've been using rather a lot recently and is really fantastic actually.

I usually ignore all instructions for cheesecake base and ALWAYS use ginger biscuits because in the great war of biscuits, gingers always beat digestives. However, with all the banoffeeness going on her I decided to obey Nigella and use digestives and Joe says it was the right thing to do - gingers would have been a step too far. I also mostly refuse to have unsalted butter in the house as it's just so depressing and sad BUT sometimes it is good and I used it here and it was fine - it's also fine in pastry but only if you are capable of adding enough salt by yourself. A lot of people aren't - what's the point in cooking something beautifully if you are going to ruin by not seasoning it correctly - ok rant over, now for the cheesecake.

BANOFFEE CHEESECAKE
Serves 10

for the base:
250g digestive biscuits
75g soft unsalted butter

for the cheesecake:
4 overripe medium-sized bananas
60ml lemon juice
700g cream cheese at room temperature
6 eggs
150g soft light brown sugar

for the toffee sauce:
100g soft unsalted butter
125ml golden syrup
75g soft light brown sugar

You will need to preheat the oven to 170C/Gas Mark 3 and have a 23cm springform cake tin and a large roasting tin to use as a water-bath. Unless you have the whole evening to make the cheesecake the night before you need it I find it easiest to take the unsalted butter and cream cheese out of the fridge in the morning and then it's all the right temperature and ready to go when you need it later.

1. Wrap the outside (underneath and sides) of the cake tin with a double layer of clingfilm, then cover thoroughly with a double layer of tin foil. You need it to be waterproof so the cheesecake is protected in it's water bath.

Clingfilm wrap
Tinfoil wrap


2. Whizz up the digestive biscuits with the butter in a mixer until you have a sandy rubble that is beginning to clump and press this into the bottom of the cake tin. Press it all down well and then put it in the fridge to cool. Wash your mixer thoroughly - you want no crumbs left at all for the next bit.

Biscuit base


3. Mash the banana's well with a fork (or in my case get your husband to do it), add the lemon juice and set aside.

My lovely assistant mashing the bananas


4. Put the cream cheese in the blender and mix until smooth then add the eggs and the sugar. Blend together and then add the mashed banana and lemon juice and whizz until you have a smooth mixture.

5. Take the biscuit base out of the fridge and sit it in the centre of the roasting tin and then pour the cream cheese mixture into the cake tin.

Cheesecake in it's roasting tin
6. Put the roasting tin in the oven and pour recently boiled water from the kettle into the roasting tin so it comes about half way up the side of the cake tin.


7. Cook for about 1 hour and 10 mins but check it after an hour (mine took 1 hour 5 mins). The very centre of the cheesecake should still have a bit of a wobble to it but be set on top.

8. Remove from the oven and take the tin out of it's water bath and put on a cooling wrack. Carefully remove the foil and clingfilm and let the cheesecake continue to cool on it's rack.

9. To make the sauce melt the butter, golden syrup and sugar in a saucepan over a gentle heat until it's bubbling. Let it bubble for 1-2 minutes until it's foamy and amber in colour. Let it cool slightly and then pour into a small jug and leave to cool. Cover it and leave it out of the fridge in a cool place overnight or however long you want. I found it useful to do this while I was waiting for the cheesecake to cool enough to go in the fridge.
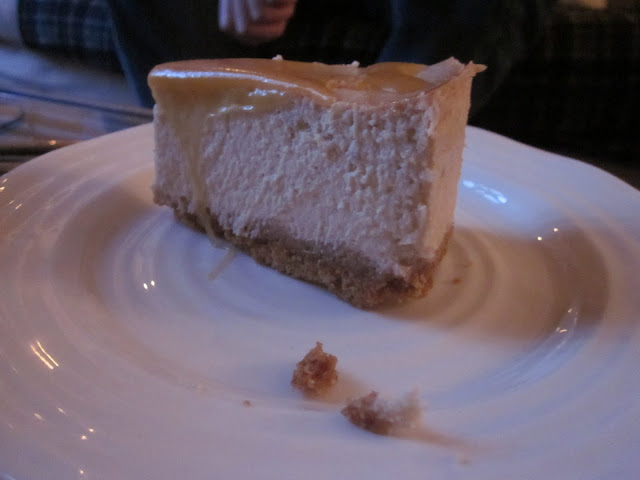


10. Put the cheesecake into the fridge when it's fully cooled and cover once it's fully chilled (it was the covering after it had been in the fridge for a couple of hours that I was doing at 3.15am).Do not cover with anything that is going to touch the top as that will stick to it. I used a big plate. Leave overnight.

11. Remove the cheesecake from the fridge about half an hour before you want to eat it. Work a spatula gently around the top edge and then put it on a serving plate and release the springform bit of the tin.


12. Whisk the sauce in it's jug and drizzle some over the cheesecake leaving the rest for people to drizzle themselves on their slice.
Nigella lawson banoffee cheesecake
Ok so not quite as beautiful as Nigella's but pretty good I think

What's great about this cheesecake is it's so impressive and you can make it up to 2 days ahead and have it waiting in the fridge. The sauce can be made 2-3 days ahead and kept in an airtight container in a cool place. It can be kept in the fridge for up to 1 month.

banoffee cheesecake slice
SHARE:
© Blue Sky and Bunting. All rights reserved.
Blogger Templates by pipdig