12 January 2022

Sweet Potato Salad

I'm late to the sweet potato party but I'm making up for lost time. I'm not a huge fan of potatoes in general and the name sweet potato does not do this delicious, filling healthy object justice. With both of us working from home and me doing the majority of homeschooling I handed the cooking reigns over to Joe but since moving to Hampshire just before Christmas I have taken back one reign and will occasionally do a freezer filler or a filling salad for a healthy lunch and this is one of my go to's. 

You can of course tweak it to suit your tastes - I would always add pomegranate seeds, Joe can live without them - but this should be just what you need to liven up your working-from-home lunch break and you can cook the sweet potato, keep in the fridge and then make the salad when you need to which means it takes a matter of minutes. 
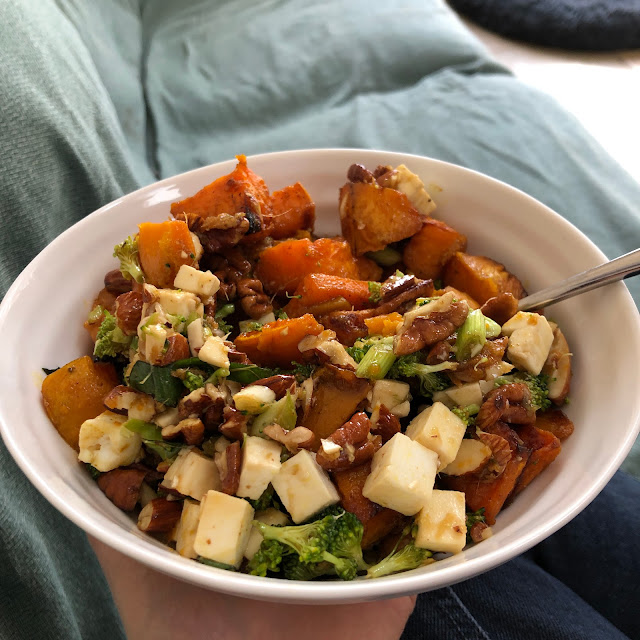

Sweet Potato and feta salad


This is the basic recipe - I tend to do the sweet potato, I usually have feta in the fridge and some herbs and then add whatever else I have. Avocado is delicious in this as are a few spinach leaves. 

Sweet Potato & Feta Salad
serves 2

2 sweet potatoes 
1/2 block feta, cut into cubes
Pumpkin seeds and/or pine nuts
Pecans and/or almonds, chopped
Half a head of broccoli
1 tbsp teriyaki 
1/2 tsp turmeric
1/2 tsp cumin
basil or any fresh herb you like
salt & pepper

For the dressing:
soy
honey
olive oil
fresh ginger

Pre-heat oven to 200C/

1. Peel the sweet potato and cut into cubes, you can par boil it or not. If you do it will reduce the time in the oven. Then toss in oil, cumin and turmeric and cook in the oven for about 40-45 minutes or until slightly crispy. 

2. In a small frying pan over a low heat sprinkle the pumpkin seeds and pine nuts with the teriyaki and cook briefly til they are coated and the teriyaki is sort of hardened onto the pan - not too much! If you don't have teriyaki soy will do just as well. Tip into your salad bowl and using your wooden spoon get the teriyaki off the bottom of the pan into the bowl too. 

3. Add the feta and then tear off tiny mini heads of broccoli into the bowl. It can seem ponderous but small bits of raw broccoli are amazing so worth it. 

4. Mix up the dressing and then put the sweet potato into the salad bowl, add the chopped nuts and the dressing. Add the basil and toss. Season to taste. 

SHARE:

31 October 2017

Green Sauce

My mother found this recipe in the newspaper (I think) and made it for me as the dressing for a cous cous salad and I was completely obsessed. When I was pregnant with Jack (and still slightly now... not slightly pregnant) I was obsessed with salsa verde and this is sort of the same thing but with one major difference. It uses preserved lemons. Before I had this sauce nothing on god's earth could get me to have anything with lemons in (I do use lemon juice in cooking but with caution) but now I usually have a jar of them in the pantry or in the fridge.

Salsa verde

This sauce is really easy to make - you need a magimix or blender - and makes something unexciting quite special. For example, tonight I cooking supper for a pregnant woman who may just be one of those who is The First Woman Ever to be Pregnant and I'm assuming a lot of foods will not appeal or be allowed. So I'm playing it safe but for those of us who want a bit of a kick there will be a bowl of this green sauce on the table for the orzo pasta which will be served with butter and garlic salt (there are other things too don't worry).
SHARE:

16 September 2015

Jamie Oliver's Gorgeous Gado Gado

Jamie's Comfort Food arrived in my life when my pregnant superhero level sense of smell was at it's peak and making a baked egg exhausted me. It has to be one of my most looked at cookery books, there are a ton of recipes I want to try out and every mood and taste is covered but they mostly require a level of time and mental involvement that I just didn't have. Until now. Now I am just about managing two children, I'm going to the gym three times a week and it's not acceptable to send my husband out for pizza 5 nights out of 7 because the large slab of fat on my tummy no longer houses a person and needs to disappear. In short I'm not pregnant anymore so I need to take control of what I eat. I'm back in the kitchen.

One of the recipes I've been threatening to try out for a while is the Gado Gado, an Indonesian salad with radishes, beansprouts and tofu, with a peanut and lime dressing. We eat salad quite a lot and I am very strict about what qualifies as a salad-that-is-a-main-course. If there is cheese or meat involved then it is a main course, without these it is just a side salad and not enough for my supper. Therefore feta and mozarella feature heavily in our diet - it's nice to explore other options. Gado Gado has neither cheese nor meat (though I'm sure you could add both) but the egg, potato and tofu sneak this one in to the main course category and it is incredibly filling. We made the amount from the book, recommended for 4 people and had two large helpings each and both had a large bowlful for lunch the next day.

This was the first time I had cooked tofu rather than using the pre-cooked stuff and it was ok - it sort of disintegrated in the pan so I'll probably use the pre-cooked next time, or just try again until I'm better at it (unlikely). I followed his instructions on cooking the cabbage and agree it's the best way to do it (see below). I do think I'd probably add at least one more tomato to this though. But I'm a tomato fan. This is basically, like all salads, one of those recipes where you use the dressing and add what you like. It's a guideline. A good one.

I've changed the order in which he does things as this, to me, makes more sense. If you want soft-boiled eggs, well I do them almost last, he does them first...

Gorgeous Gado Gado
Serves 4

for the salad:
400g new potatoes
4 large eggs
400g firm silken tofu
sesame oil
½ Chinese cabbage
2 ripe tomatoes
1 handful radishes
½ a cucumber
2 handfuls ready to eat beansprouts
½ bunch fresh coriander
optional: prawn crackers
optional: 1 fresh birds eye chilli

sauce:
1 clove garlic
50g palm sugar  (I used this)
120g crunchy peanut butter
1-2 fresh red chillies
juice of 2 limes
2 tsps fish sauce
1 tbsp low-salt soy (we just have normal soy)
1 tbsp tamarind paste

You will need a magimix or blender for the sauce though of course you can mix it by hand, and a frying pan for the tofu if you are cooking it yourself.

1. Scrub the potatoes and cook in salted boiling water for 15-20 minutes or until tender; then halve or slice them up.

2. Finely slice the cabbage if you want it raw of if you want it cooked, which is more traditional, cut into 2cm slices, place in a colander and slowly pour a kettle of boiling water over the top.

3. Cut the tomatoes into wedges, quarter the radishes and slice the cucumber.

4. Put all the veg into a bowl and season with salt.

5. Cut the tofu into 2½ cm chunks and fry in a splash of sesame oil for about 15 minutes, or until golden, then sprinkle lightly with salt.

6. While the tofu is cooking put the eggs on to soft boil for 6 minutes or longer if you prefer. Place all the sauce ingredients in a blender, peeling the garlic and grating the palm sugar if needed, and blitz until smooth. Taste and adjust the seasoning - you want this to be quite limey so I added some more.

7. Traditionally you serve this in individual bowls adding the salad first and then mixing in the dressing. Jamie adds the sauce to the bowls first with the dressing on top so the individual can see all the ingredients while they mix the dressing in. I am lazy. I put it all in a big bowl, added the dressing and mixed. Tastes the same, doesn't look as beautiful as you can see from my picture. If I was making this for other people I would probably do the individual bowl thing.


SHARE:

14 August 2014

Nigella Lawson's Italian Apple Pie

We've unpacked my cookery books! Finally after months of having to cook from memory I'm able to try out the huge list of recipes I've flagged for testing. One of the books I was really looking forward to getting my hands one was Nigellissima: Instant Italian Inspiration and so when I decided to have my family for a summer supper in the garden I cooked two recipes from it. The first was a pasta dish which was perfectly nice but needed some tweaking (in my opinion). The other recipe was this Italian Apple Pie which I did at the last minute realising I'd forgotten about pudding and I had some apples that needed using up.

I was really focussed on the pasta and indeed so focussed that I was happily gossiping outside not realising that the alarm was going off to let me know the pie was reading - meaning it had a few charred patches. A disaster I thought, bin it immediately. However, I was persuaded to serve it and I am so glad it was saved from the bin. It was incredibly delicious and unusual and actually very light for what is basically a cake (the sponge was so good I'm going to use this method for other cakes) and great with double cream (and strawberries on the side) for a pudding or indeed with a cup of coffee as elevenses, It is incredibly easy to make and Ned loved it so much that he learnt to say 'cake'!

Italian Apple Pie

Serves 8

100g soft unsalted butter, plus more for greasing
250g plain flour
2 tsp baking powder 
pinch of salt
150g caster sugar
2 eggs
zest 1 unwaxed lemon
1 tsp vanilla extract
75ml full fat milk, at room temperature
3 pink lady apples, or any crisp eating apples (approx 500g in total)

You will need to grease a 22/23cm springform cake tin and line the bottom with baking parchment. Pre-heat the oven to 200C/Gas Mark 6/400F.

1. Into a food processor put the flower, baking powder and a pinch of salt, 100g soft butter, caster sugar, eggs, lemon zest, and vanilla extract, and blitz until it forms a thick smooth batter. Then, with the motor still running, pour the milk gradually down the funnel to lighten the mixture.

2. To do this by hand, beat the butter and sugar together until pale and creamy, then beat in the eggs, followed by the flour, baking powder, salt, vanilla, lemon zest, and milk until you have a batter with a soft dropping consistency.

3. Halve 1 of the apples, the peel, core and chop one half into approximately 1cm cubes, add these to the batter and either pulse to mix, or beat in. Pour your batter into the springform tin.

4. Quarter and core the remaining apples (including the unused half apple), leaving the skin on, then finely slice them and arrange in concentric circles (or how you can) on top of the cake batter.

5. Mix together the brown sugar and cinnamon and sprinkle this over the apples, then bake for 40-45 minutes, by which time the cake should be risen and golden. Piece with a metal skewer, should have only a few crumbs sticking to it when removed.

6. Leave to cool for 1 hour, before springing it out of the tine to cut and serve warm, or leave to cool completely once out of the tin
SHARE:

12 February 2014

Saganaki

I love feta cheese but I'm aware that not everyone shares my passion. My mother is one of these people yet it was she who suggested I try this recipe out on some friends who were coming to supper as she thought it looked like a delicious and unusual starter. Whilst babysitting for me one day a week she works her way through my cookery books copying recipes and making my tummy rumble by shouting out suggestions for what we should be eating even though she knows I'm on a diet.

So rather than going for my usual something-on-toast easy starter for supper the other night I decided to try out the suggested Saganaki from Sarah Raven's Garden Cookbook and it was really tasty and, if you had a round table, probably quite fun to help yourself straight from the dish with warm flat bread.

Saganaki

for 6

600g (3 packs) feta cheese, broken into rough 2cm pieces
20 large or 30 small cherry tomatoes
20 capers
15 Kalamata olives, halved and stoned
2 tbsp olive oil 6 sprigs of thyme or marjoram

Pre-heat the oven to 200C/400F/Gas Mark 6. You can make this as individual parcels for cooking on an open fire - 100g feta, a few tomatoes, capers and olive pieces, herbs and oil on top, fold loosely and cook for 10-15mins but I did it in one big dish.

1. Crumble the cheese into a shallow, oven-proof dish, dot the tomatoes around sprinkle over the capers and olive pieces, drizzle with oil and sprinkle the thyme or marjoram over the top.

Saganaki - pre-oven


2. Bake in a hot oven for 15-20 minutes until the cheese is bubbling and browning on top. Eat hot or warm. I served with mini pitta bread but think the flatter the bread the yummier probably.
SHARE:

29 January 2014

Oven Roasted Kale - This Could Change Your Life

I'm very up-and-down about Kale. I sort of crave it's irony goodness but at the same time always find it a bit fluffy and chewy and sort of... kaley. But then I was told to oven roast it and I have actually been doing nothing but roasting myself kale and eating it like crisps ever since.

This is in fact basically how they make crispy 'seaweed' in Chinese restaurants (though probably using a more authentic vegetable) so if you like that then this is the recipe for you.

Am I the last person to know about this I wonder?

Oven Roasted Kale

Makes as much as you want.

Preheat the oven to 180C/350F/Gas Mark 4.

1. Wash the kale and tear it into the size you want.

2. Spread on the baking sheet. Drizzle with olive oil, sprinkle with salt and then mix it round with your hands so you coat every bit of kale.

3. Cook in the preheated oven for 3 minutes. No more, no less.

That's it.
SHARE:

12 November 2013

Leftover Cheese Sandwich Pudding

The title of this sounds a bit gross I know and I have to say when my mum first suggested it I thought she had gone nuts but it was totally yummy and has now made me believe that any form of leftover can be made into something delicious. Which is true to a certain extent. I made cheese, ham and cucumber sandwiches for Ned's first birthday party (along with lots of other things) and there were some leftover which I was determined not to throw out. I ate the ham for lunch but really they would have been lovely in this but I was hungry. So there.

This is a hard recipe to write up as the amounts depend on how many sandwiches you have. It would also work well with lots of other kinds of sandwiches - ham, tomato... probably not cucumber... so don't feel restricted by the fact that this recipe is mainly cheese. You can also add whatever you like - my husband doesn't think something is cooking if it doesn't involve an onion. Garlic would be nice too but this is the basics - do with it as you will.

Leftover Cheese Sandwich Pudding

Leftover cheese sandwiches (I had about 20 which were quarter squares on a mix of white and brown bread)
2 eggs
¼ to ½ pint of milk
Cheese (preferably something tasty and melty - cheddar, red Leicester etc)
Parmesan
Salt and Pepper

Pre-heat the oven to 190C/375F/Gas Mark 5 and butter an ovenproof dish that will suit the amount of sandwiches you have - you want at least two layers of sandwiches in the bottom and enough room for this to rise a bit.

1. Layer the leftover sandwiches in the bottom of your buttered dish and squish them in a bit.

2. Beat the eggs in a bowl and add the milk. Beat a bit more and season with salt and pepper.

3. Pour the egg/milk mix over the sandwiches and leave to stand for half an hour or so.

4. Grate cheese over the top (I even splodged on some cream cheese that I wanted to use up) and cook for about half and hour or until the cheese is starting to go golden and it has puffed up a bit.

5. Serve with a salad and some chutney. It was delicious.

Leftover Cheese Sandwich Pudding

SHARE:

18 September 2013

Pickled Cucumber Salad

In my family there's really nothing (well nearly nothing) we like more than a lunch of 'deli foods'. This does not require a trip to an actual deli, though that is a bonus, but should include some of the following: cheeses, salami, smoked salmon, pate, bread, tomatoes, pickles and chutney. Birthdays are often a good excuse for a deli foods lunch and my mothers birthday last Friday was no exception. However, even though this is the easiest, (though not necessarily the cheapest) option for whoever is hosting the lunch, in this instance me, I always like to have something homemade. More than a salad but not necessarily something as extravagant as Heston Blumenthal's Quiche Lorraine. I was incredibly short on time, thanks to an earlier incident with a much-hated aubergine, and thought now was finally time to try out the Pickled Cucumber Salad recipe I'd written down six years ago and have failed to make ever since. Goes very well with fish.

I know some people are iffy on pickles but I LOVE THEM. So deal with it.

Pickled Cucumbers

Serves 4-6 as part of a picnic

2 medium cucumbers
2 cups white wine vinegar
1/2 cup of sugar
1/4 tsp freshly ground white pepper
3 tbsp finely chopped parlsey

1. Peel the cucumbers and cut into thin slices.

2. Place the slices, with a sprinkling of salt between layers, between two plates with a weight on top (I used a couple of cans) and leave to stand for about an hour.

3. Pour off the juice that has formed and put the slices in a salad bowl.

4. Mix the dressing of vinegar, sugar, pepper and parsley.

5. Pour the dressing over the cucumber and refrigerate for a couple of hours before serving.
SHARE:

17 April 2013

Oeufs en Cocotte or Baked Eggs

Years ago we went to a Le Creuset sale. I dragged Joe along promising him that basically we'd be saving money in the long run and we would only buy sensible things. All this was true except at the end there were these really sweet tiny little Le Creuset round casserole dishes in four colours and well I just snuck them into the trolley and persuaded Joe at the check out that they would be incredibly useful for single portions of things. To be honest it was a massive lie - I like small things and the colours were so pretty that I just wanted them to take up valuable space in my kitchen. Which they do.

They are, however, the perfect thing for Oeufs en Cocotte which is one of my favourite things to make when I either have too many eggs or leftover double cream that needs eating. It isn't slimming but a little goes a long way as it's quite rich (I can't usually finish two of these) there is something incredibley soothing about being able to eat something in the evening that involves toasted soldiers... which this really should.

This makes enough for two fatties or four people though I really like this as a late night quick comfort supper which usually means there's just you... you can add all sorts of things but I never bother as this is great as it is. There are loads of recipes for this all over the place - this is how I do it.


Oeufs en Cocotte

Serves 2-4

200mls double cream
2 tbsp grated Parmesan
4 large eggs
salt and pepper

I make this in my Le Creuset mini casseroles but they would be fine in ramekins too. Whatever you are using you will need four of them and they need to be buttered. You will need a roasting tin or something in which to make a bain marie - the water will need to go about ¾ of the way up the sides of your ramekins. Once buttered put the dishes in the tin ready to pour the water in. Pre-heat the oven to 190C/375F/Gas Mark 5.

1. Warm the cream in a pan then add the salt, pepper and cheese.

2. Pour the cream into the prepared ramekin.

3. Crack an egg into each ramekin on top of the cream.

4. Place the roasting tin into the oven and then pour in enough hot water to come ¾ of the way up the ramekins.

5. Bake in the oven for about 10 mins or until the eggs are set.

6. Add a pit of salt and pepper and serve with toasted soldiers.


SHARE:

1 November 2012

Quails Egg Pasta

I'm terrible at cooking for vegitarians. I have a couple of friends who are, or have been, veggie and I know from them that it's usually a choice of goats cheese, mushrooms or veggie sausages and this puts me into a cookery tail spin because then all I can think about is making a goats cheese tart... However, this is a yummy option that is actually really easy but exciting enough to cover up the fact that really it's pretty studenty!

Quails Egg Pasta

Serves 4

400-500g fettuccine
1 head of garlic
12 quails eggs
125ml single cream
25g grated Parmesan
salt and pepper

Pre-heat the oven to 180C/350F/Gas Mark 4. You can of course you any kind of pasta you like, fettuccine is my favourite long pasta that's why I use it here. And you can use double cream if you prefer, I usually do but for this with all the roasted garlic I like the consistency of the single cream. You can be extra cheaty and buy pre-boiled and peeled quails eggs but ideally you want these to be slightly soft-boiled.

1. Wrap the garlic in tin foil and roast in the pre-heated oven for 30 minutes or until it's all soft. Remove from oven and leave to cool a little bit.

2. Put the pasta on.

3. Open the garlic and squeeze it from its skins into a small bowl and mix with the cream, Parmesan, salt and pepper.

4. Cook the quails eggs according to the instructions on the packet. You want slightly soft boiled but so that the yolk stays mostly where it is. 1 minute in a pan of boiling water should do it. Peel when they are cooled slightly.

5. When the pasta is cooked, drain it and return it the sauce pan mixing in the cream and garlic. Taste and adjust the seasoning.

6. Dish up and then add the halved quails eggs to each plate with an extra grind of pepper and grate of Parmesan.

You can see that I've cheated and used pre-boiled quails eggs, still yummy but not perfect


SHARE:

5 September 2012

Spicy Bean and Vegetable Soup

I made this soup for my husband once when we were doing Anna Richardson's Body Blitz and ever since he has requested it and got all misty eyed about how I used to make it all the time. So on Bank Holiday Monday, when he dashed off to Carnival by himself having deemed me 'too blimpy' to be allowed to go too, I bloody well made him some. I've even frozen some for when we get back from our holiday and I am lying in a pre-baby panic coma.

Now I'm not a huge soup fan and I hate courgette's so I don't eat this but my mother and husband love it and I trust their taste buds so here it is. This is from a diet book but you can substitute the oil spray for olive oil if you'd rather.

Spicy Bean and Vegetable Soup

Makes 4-6 servings (depending on who you are feeding)

Mild cooking oil spray
1 medium onion, peeled and finely chopped
2 garlic cloves, peeled and crushed
1-1 ½ tsp hot chili powder or smoked paprika
2 x 400g chopped tomatoes
400g can red kidney beans
400g can cannellini beans
1 tbsp tomato puree
1 vegetable or chicken stock cube
1 red and 1 yellow pepper, deseeded
3 small courgettes, trimmed
198g can sweetcorn, drained

1. Mist a large pan with the oil and gently fry the onion and garlic for about 5 minutes until very soft, stirring regularly. Stir in the chili powder and cook for a further minute.

2. Tip the tomatoes into the pan, then refill the can with cold water and pour over the tomatoes. Drain and rinse the beans and add them, the tomato puree and stock cube to the pan. Bring to a simmer and cook for 10 minutes, stirring occasionally.

3. Cut the peppers into roughly 1cm chunks. Cut the courgettes in half lengthways and then into 1cm slices.


4. Stir the peppers into the pan and continue simmering for a further 5 minutes. Add the courgettes and sweetcorn.


5. Simmer the soup for 5 minutes more or until the courgettes are tender, stirring every now and then. Season with a little salt and black pepper before serving.

SHARE:

6 June 2012

Macaroni Cheese De Luxe

This has to be in my top five all time favourite things to eat and now I've tried this recipe I won't really use anything else. It's quite time consuming and it makes enough for an army but that's fine by me. I can spend a lot of time testing the cheese sauce is just right and then have loads of individual portions in the freezer so I can eat this whenever I want. Perfect!

This recipe is from Nigella Christmas: Food, Family, Friends, Festivities as part of her Christmas Eve supper for 10-12 people. It is fantastic to have in the freezer over Christmas and New Year for those days when you are too exhausted to cook and to soothe the night before the dreaded return to work. I know that there is a quicker version in Nigella Express and maybe, for sake of comparison, I will do that one next time but for those who want the ultimate Macaroni Cheese recipe this is it. Sometimes i crisp up some Oscar Meyer bacon and sprinkle  it in when I pour the sauce over the pasta but really it doesn't need it.

Unless you have a huge oven dish (Nigella recommends 36cm x 26cm x 6cm deep) you will need two or three - I can just about fit all of this into my two largest ones. You will need two large saucepans too - one for the pasta and one for the sauce - I have to do my macaroni in two batches which is slightly annoying.You can serve this with salad if you wish... I don't think it really needs it.

Macaroni Cheese De Luxe

For 10-12

175g soft butter, plus more for greasing
150g plain flour
2 tsps Dijon mustard
3 x 170g cans evaporated milk, 500ml total
1.5 litres semi-skimmed milk
2 x 500g packets macaroni
275g Emmental, chopped or grated
300g red Leicester or Cheddar, chopped or grated
75g Parmesan, chopped or grated
salt

Quite often I find that Emmental comes in smaller packets of 240g and cheddar in 350g so I just use all of those to make up the difference. I actually find the taste is a bit better as I get the strongest cheddar I can find...

Pre-heat the oven to 220C/425F/Gas Mark 7 and grease your roasting dish with butter.

1. Start heating a large pan full of water on the hob for the pasta.

2. Put another pan (with a lid), though not quite as big, to heat on the hob for the cheese sauce; melt the butter over a medium/low heat, add the flour, stirring until you have formed a roux. Cook, still stirring, for 5 minutes over a low heat.

Roux


3. Add the Dijon mustard to the pan and stir well, then take off the heat.

4. Pour the evaporated milk and the fresh milk into a jug and slowly whisk this into the roux. Be patient or you will get lumps.

White sauce


5. When you have whisked in all the liquid, put the pan back on the heat and cook, stirring with a wooden spoon, for about 10-15 minutes, or until the flouriness has gone.

6. When the sauce is ready, add the chopped or grated cheeses (reserving a handful). Stir until the cheese has melted, season to taste and take off the heat, with a lid so no skin forms.

7. Meanwhile when the water from the first pan has come to the boil, salt it extravagantly and cook the macaroni for a couple of minutes less than directed on the packet and drain.

8. Tip the drained pasta into the prepared dish and scrape the cheese sauce on top. If you are going to add bacon bits, do so now. With a couple of spatulas or your wooden spoon mix together until the pasta is coated in the sauce.

Cling-filmed macaroni ready for the cheese


9. Sprinkle over the reserved cheeses and transfer to the oven to cook for 15-20 minutes or until the top has scorched slightly and the underneath is bubbling. This is best left to stand for 20 minutes or so out of the oven before serving.

Macaroni Cheese
Finished macaroni cheese


To make ahead: Get to the end of stage 8, cool. cover with clingfilm and keep in the fridge for up to 3 days. When ready to cook, preheat the oven to 200C/400F/Gas Mark 6. Remove the macaroni from the fridge while the oven is heating and cover with foil. Place the dish in the oven for 20 minutes, then uncover, sprinkle over the reserved cheeses and reheat for a further 20-30 mins until piping hot and golden.

To freeze: Get to the end of stage 8, cool, cover and freeze for up to three months. Thaw overnight in the fridge and reheat as above.
SHARE:

23 March 2012

Sarah Raven's Stuffed Potatoes

I've been wanting to do these for ages because they involve Wensleydale which helpfully can be substituted with Cheshire which is my most favourite of all the cheeses. I made them last night and they were yummy but incredibly fillling so don't go over the top like I did and assume you need the largest potatoes on the planet. You don't.

These are pretty easy and can be made in advance and kept in the fridge for up to two days to cook when needed or they can be frozen at the just stuffed stage. As usual with Sarah's recipes this didn't need any tweaking at all - although I seasoned the potatoes my way which I've inclueded. This comes from the ever fantastic Garden Cookbook published by Bloomsbury.

Stuffed baked potatoes with pesto

For 4

4 baking potatoes
Olive oil
200ml creme fraiche
175g grated cheese (Wensleydale or another crumbly hard cheese; Parmesan is also good but halve the amount; I used Cheshire)
150ml pesto (homemade or bought)
2 garlic cloves, peeled and crushed
Salt and black pepper

Preheat the oven to 180C/350F/Gas Mark 4.

1. Wash the potatoes and score round the full diameter of the potato with a sharp knife, only just piercing the skin. This makes it easier to cut them precisely so that you get two perfect halves.

2. Rub each potato with a little olive oil and then salt and pepper.

3. Bake the potatoes for about an hour, until they are cooked all the way through. Remove them from the oven , keeping it on, and cut them in half.


4. Carefully scoop out the potato from the skin and put into a bowl.


5. Add all the other ingredients to the potato flesh and mix thoroughly with a fork. Spoon the mixture back into the potato skins piling them up above the edges so they look generously filled.

6. Return them to the oven for about 15 minutes until the top becomes golden.


7. This is great served with a salad.
SHARE:

23 January 2012

Pea and Herb Risotto

No sooner do I say that I'm going to cook more things from Jamie Does...then... well I make the pea and herb risotto from it. I am not friends with risotto. I don't really like rice as it is and whenever I've tried to make risotto before it's always been a bit crunchy and bland. But this was really nice and I made enough for 4 people and Joe ate 3 peoples worth so it must of been quite good.

The main recipe is for Risotto Bianco and then he has a few variations so I'm going to do this all as one recipe but the others look amazing too so really... you should just suck it up and get the book.

Pea and Herb Risotto

Serves 4

For the risotto bianco:
1 litre vegetable stock
olive oil
1/2 an onion, peeled and finely chopped
1 stick of celery trimmed and finely chopped
300g risotto rice
sea salt and freshly ground black pepper
125ml white wine
a knob of butter
a large handful of freshly grated Parmesan

For the pea and herb bit:
a knob of butter
300g fresh or frozen peas
a small bunch of fresh mint, leaves picked and chopped
a small bunch of fresh flat leaf parsley, leaves picked and chopped
100g soft goats cheese
Parmesan Cheese
extra virgin olive oil

I cook this in a large saucepan, you need one that is reasonably high sided as you are going to add a lot of stock. I think one of the reasons this worked was keeping the stock in a pan on a low heat rather than just making it up in a jug and leaving it. I also didn't have any celery and it tasted yummy without but if you are making plain risotto it would probably need the celery.

1. Pour your stock into a pan and leave on a low heat.


2. Put a good lug of olive oil into your high-sided pan over a low heat and put in the chopped onion and celery. Cook gently for ten minutes, stirring occasionally until soft but not coloured.

3. Turn the heat up to medium, add the rice and a pinch of salt and stir for 2 minutes. Pour in the wine and stir until absorbed.

4. Add a ladleful of hot stock, stir and wait until it's been fully absorbed before adding more. Cook for 16 to 17 minutes adding a ladleful more stock every minute or so and stirring regularly, until the rice is al dente. When it's done it should be slightly looser than you want it as it'll thicken as it sits.

5. Meanwhile for the pea and herb extras melt the butter over a medium heat in a smaller pan and add the peas, fresh herbs and a splash of hot water.

7. Put the lid on a cook for 4 minutes.

8. When you have finished ladling the stock into the risotto bianco take the pan of the heat, stir in the butter and Parmesan, then season to taste.

9. Stir in the herby peas, put the lid back on the pan for 2 minutes.

10. Divide between the plates and put a slice or small scoop of goats cheese on the top. Sprinkle with grated Parmesan and drizzle with extra virgin olive oil.

SHARE:

18 January 2012

Sesame Peanut Noodles

Another of the choices for my studio picnic with my sister and also another from Nigella Express. Next time I make it (and there will be a next time) I think I'd scatter over some crushed salted peanuts. This would be great to make at the beginning of the week as a yummy, easy lunch.

Sesame Peanut Noodles

Serves 8

For the dressing:
1 tbsp sesame oil
1 tbsp garlic oil
1 tbsp soy sauce
2 tbsp sweet chili sauce
100g smooth peanut butter
2 tbsp lime juice

For the salad
125g mangetout
150g beansprouts, rinsed
1 red pepper, deseeded and cut into small strips
2 spring onions finely sliced
2 x 275g packets or 550g ready prepared egg noodles
20g sesame seeds
4 tbsp chopped fresh coriander

1. Whisk together all the dressing ingredients in a bowl or jug.

2. Put the mangetout, beansprouts, red pepper strips, sliced spring onions and the noodles into a bowl.

3. Pour the dressing over them and mix thoroughly to coat everything well.

4. Sprinkle with the sesame seeds, chopped coriander and salted peanuts if you want to try them out!

SHARE:

24 October 2011

Apple and Raisin Muffins

I've wanted to make muffins for ages but never had a muffin tray... then I got one thanks to the lovely but evil le creuset sail a couple of weeks ago. Now the wedding season is finally over I spent most of Sunday in the kitchen baking and on seeing some granny smiths that needed eating I decided to launch into muffin making. They don't look like the ones in the shops that I've seen but that's fine isn't it? They went down very well with the boys at half time during the Fulham game on Sunday afternoon.


Apple and Raisin Muffins

Makes 12

225g plain flour
1 tsp baking powder
1 tsp bicarbonate of soda
100g caster sugar
1 large egg, lightly beaten
60g unsalted butter
150ml milk
2 apples, peeled and grated
1 tsp ground cinnamon
60g raisins

Pre-heat the oven to 190C/Gas Mark 5. Line your muffin tins and melt the butter and set aside to cool a bit.

1. Sift all the dry ingredients together into a bowl and then add the apple and raisins.

2. In another bowl whisk together the egg, butter and milk. Add this mixture to the dry ingredients and quickly stir everything together. It should be quite thick. You can add a drop more milk if you think it's too stiff but you really don't want to overwork the mixture.

3. Fill the muffin cases until they are about two thirds full and then bake in the oven for 15-20 minutes until risen and golden.

4. Leave to cool in their tin until they are cool enough to be handled and then transfer to a cooling rack.
Not bad for a first attempt!
SHARE:

15 September 2011

Leek and Goats Cheese Tart

Rather refreshingly we have my 19 year old cousin staying with us at the moment before she goes back to uni and she requested a leek and goats cheese tart which I was pretty excited about as I love it and I had a recipe for one that I've wanted to try for ages. It's in Sarah Raven's Garden Cookbook and the reason it's so appealing is that the pastry is incredibly easy and use of mustard on the tart base means the rest of the ingredients can be really simple. I did do a couple of tweeks which I'll put in brackets after the ingredients so you can use my version or hers... in fact you should just buy the book. It's wonderful.

So, this tart was delicious, I didn't add all the creamy filling as I was worried about it bubbling over but I could have done, as it was it was fine but I like as much cream as possible!

Leek and Goats cheese tart

Serves 4-6

For the pastry:
120g butter
1/2 tsp salt
200g flour

For the filling:
2 tbsp Dijon mustard (I think one large one would be fine)
4 leeks, thinly sliced (I used three large and there was still too much)
285ml single cream
Salt and Pepper
2 large eggs and 2 large egg yolks
200g goats cheese
2 tbsp olive oil
200g soft goats' cheese

Pre-heat the oven to 180C/350F/Gas Mark 4. You need a 23cm flan tin lined - I find it helps to rub a bit of butter round mine.

1. Make the pastry by sifting the flour with the salt and either rub the butter into the flour with your fingers, or pulse in a food processor, until the mixture resembles breadcrumbs. Add just enough cold water to bind the dough together.

2. Roll out the dough and line the flan tin. Prick the base and put it in the fridge for at least an hour.

Tart base
3. Cover the tart base with baking paper and fill with baking beans and bake in the oven for 20-25 minutes. Remove the baking beans and leave to cool.

4. When the pastry has cooled a little, spread the Dijon mustard over the tart base.

5. Beat together the eggs, yolks, cream and seasoning.

6. Gently fry the leeks in the oil until they are soft and put them in the tart. Crumble over the goats cheese and pour the egg mixture on top.

7. Bake in the oven for 20 minutes until the tart is set - I found it was more like 25.

Finished tart
SHARE:

18 August 2011

Quails Egg Pasta

OK so I wasn't going to write this up as there are no photos or measurements and it all seems a bit obvious BUT it was incredibly yummy and as weird as it sounds sometimes, just sometimes, you may have a few left over quails eggs and it's a bit hard to know what to do with them (apart from boil them and eat them with celery salt which is of course always perfect). This was incredibly soothing and delicious but you don't actually need too many quails eggs because it will become a bit 'quiet making' as it's called in my family.

Now I know there are ways you can make this more exciting, you can use roast garlic (wrap the garlic in foil, roast in 180C oven for half an hour, cool, squeeze out of skin, mash with fork)but that is fiddly and the point of this recipe is that it's supposed to be quick and soothing. For this I even couldn't be bothered to go out and get herbs to add in. All of this you can and I won't mind... but I wanted instant, yummy and no more quails eggs left hanging around in my fridge.

Quails Egg Pasta

Serves 2

Quails eggs, however many you want. I think 2-3 per person is good
200g spaghetti (or whatever pasta you have kicking around)
Parmesan, a good lot I'd say about 40g
Double cream, about 150ml
Garlic salt, good pinch
Pepper

1. Put the pasta on to boil.

2. Pour the cream, Parmesan, garlic salt and pepper int a bowl and whisk together. Taste it for seasoning. If you want more garlic but less salt then use garlic granules.

3. Cook the quails eggs - I think a minute and a half is good as they should then be still slightly soft boiled but peelable. It takes a while to peel these so don't leave to the last minute as it will just make you cross.

4. Drain the pasta, stir in the cream mixture and put into bowls. Grate a little extra Parmesan onto the pasta and gently stir through. Cut the eggs in half and put them on top of the pasta. YUM
SHARE:

10 August 2011

Watercress Soup

I'm not very good with numbers, although I have known this for years and have whole heatedly given myself over to my numerical incompetence every now and again it rears it's ugly head in the kitchen. When ordering the ingredients for the Salmon and Watercress salad last week I ordered 200g of Watercress rather than the necessary 100g which is why on the hottest day of the year so far I was to be found making Watercress soup. It was actually really tasty and because I put in the fridge after I made it, it meant that the next night I could just heat it up which was actually much nicer than slaving in the kitchen in the sweltering heat. This is incredibly easy...

Watercress Soup

Serves 2 or 4 as a little starter

4 new potatoes, peeled and quartered
1 yellow onion, roughly chopped
1/2 pint stock, can be chicken or vegetable, I used Hugh F-W's souper mix which I had in the fridge
75g watercress
Milk
double cream if you have it
Butter
Olive Oil
salt and pepper

You just need a big pan for this and a blender.

1. Heat the oil and butter in the pan and sweat the onion until translucent - 5 or so minutes.

2. Add the potatoes and cook for a further 5 minutes without letting them get brown.

3. Add the watercress to the pan with the stock, season and then cover the pan and simmer it gently until the potatoes are tender. About 10 minutes.

4. Switch off the heat and allow the soup to cool a little before pouring it into the blender and whizzing it.

5. Clean the pan and return the blended soup to the heat and add enough milk to give it a nice consistency.

6. Bring to simmering point and then remove the pan from the heat, test the seasoning and serve in soup bowls with a swirl of the double cream and a few bits of chopped watercress if you've got any leftover.


SHARE:

27 June 2011

Sarah Raven's Shallot Tatin

I've adapted this slightly from Sarah Raven's recipe in her lovely Sarah Raven's Garden Cookbook which is just one of the nicest presents I've ever received. I must have had it for three or so years and I still read through it and find new things I want to try out. I really like making tarts, pies and quiches for Saturday lunch and this looked like a great twist on an old favourite. As I said I've amended it slightly...

SHALLOT TATIN
Serves 4-6

500g shallots, I used big sweet ones but any will do
250g Camembert, ideally some that's been left out of the fridge and cut into thickish slices
40g unsalted butter
2 tbsp olive oil
1 tbsp soft brown sugar
500g puff pastry
salt and black pepper

Preheat the oven to 200C/Gas Mark 6/ 400F. You will need an ovenproof pan or frying pan. Not a very big one though - you want the onions to fit quite snugly in it.

1. Peel the shallots but leave them whole. Cook the shallots in boiling water for 8-10 minutes, drain and leave to one side.

2. In your ovenproof pan heat the butter and oil and, when the butter has melted, sprinkle over the sugar and allow it to dissolve gently before adding the shallots.

cooking shallots
My Shallot's looking like squid
3. Cook the shallots until they are a rich golden caramel colour. This takes longer than you think - I found about 15-20 minutes was fine. Remove the onions from the heat and start rolling the pastry.

4. You want to roll the pastry out to be slightly bigger than the pan and round. If you are using shop bought pastry it will probably come in a square so roll it out and then cut it in a circle as you trim it down to the right size for your pan.


5. Spread the slices of cheese over the shallots and then lay the pastry on top, pushing the sides down slightly.

6. Bake the tart for about 25 minutes until it is golden and risen.


7. Remove from the oven, allow to cool for a couple of minutes and then, very carefully place a plate on top and flip the pan over very quickly. You may need to ease a spatula around the tart slightly first to loosen it.

Inverting the tatin - I got my Mumma to do it!


8. This is great with salads for a tasty lunch - looks impressive too but is surprisingly easy to make.

Sarah Raven's Shallot tatin
SHARE:
© Blue Sky and Bunting. All rights reserved.
Blogger Templates by pipdig